Google Discovery Ads Complete Guide 2021-2022
Complete Tutorial To Optimizing Google Discovery Campaigns

While standard display ads run on websites, apps, and YouTube videos, Discovery ads are eligible to serve across the YouTube Home and Watch Next feeds, Discover feed on the Google Search app, and in Gmail Promotion and Social tabs and open up new avenues for both Google and advertisers.
Discovery campaigns let you share your brand’s story with people across Google’s feeds when they’re open to discovering new products and services. Google
With Discovery Ads you could reach up to 3 billion people across different Google placements. Besides that Google Discovery Ads delivers your ads to a way better audience, could say that you get premium traffic within the Discovery platform.
Discovery ads help you reach up to 3 billion people across highly popular feeds on YouTube, Discover, and Gmail.
Find Discover
You can find Discover in a few different ways:
- In the Google app

- On your Android phone or tablet, in your browser on google.com.
- On some devices, swipe right from your device’s home screen.


When to use Discovery Ads?
You may want to use Google Discovery Ads to:
- drive conversions with your media at scale: For example, you can use Discovery ads to drive sales, newsletter signups, or more website visits.
- to reach new customers with your media:
- By sharing visually rich,
- inspiring brand creative across feeds on Google properties,
- Discovery campaigns can help you drive interest from potential customers when they’re open to trying new brands. For example, you can extend a successful audience strategy for social or video campaigns to new audiences on Google’s feeds.
- Use Discovery ads to reconnect with your most valuable customers by remarketing campaign:
How to get started with Discovery campaigns?
Google Discovery Ads Guide Quick Navigation:
- Step 1. Conversion Tracking Set-up
- Step 2. Create a new Discovery Ads campaign
- Step 3. Select the Goal Objective
- Step 4. Choose the Discovery Campaign Type
- Step 5. Select locations to target
- Step 6. Choose The Bidding Strategy
- Step 7. Set the budget you want to spend each day
- Step 8. Google Discovery Ads Targeting. Define your Audiences
- Step 9. Optimized targeting: get more conversions with your budget
- Step 10. Create your ads
- Step 11. Discovery Ads Extensions
- Step 12. Reconnect with your most valuable customers with a remarketing campaign
- Step 13. Discovery Ads Optimization Tips And Best Practices
Google Ads Discovery Campaigns Complete Tutorial 2021

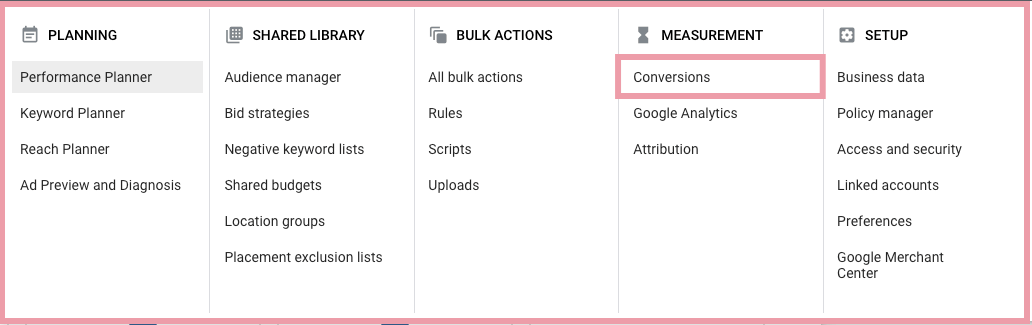
1. Conversion Tracking Set-up
![]()
To get the best performance for your Google Ads campaigns, you should start by setting up the conversion tracking on your website.
You can import events from your Google Analytics as a conversion or set up a new one directly in Tools and Settings › Conversions
Learn more about Google Ads Conversion Tracking Set Up Complete Guide
2. Create a new Discovery Ads campaign
2.1. Navigate to Campaigns section ➜ + create NEW CAMPAIGN

Once you have conversion tracking set up properly, you need to create a new campaign in your Google Ads account.
As it was mentioned before, Discovery ads are available for Sales, Leads, or Website Traffic Objectives
3. Select the Goal Objective
Discovery Ads are available for the following campaign goals:
- Sales
- Leads
- Website traffic
3.1. Select the goal that would make this campaign successful to you


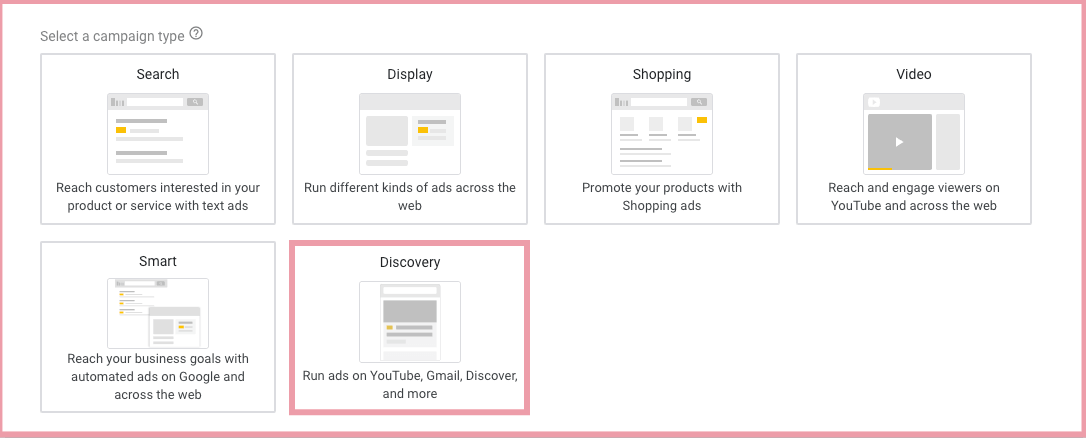
4. Choose the Discovery Campaign Type
4.1. Select a campaign type ➜ Discovery
5. Select locations to target
5.1. Enter your campaign name ➜ Choose the target location


6. Choose The Bidding Strategy

For Discovery Ads you can use 3 bidding options, all of them are Automated bid strategies:
- Target CPA
- Target ROAS
- Maximize conversions (be cautious with this type of bidding, cause it most likely overspends your budget)
PRO TIP: Use Maximize conversions to accelerate your campaign for getting traffic
In my experience, Maximize conversions bidding type accelerates the process of getting traffic, but at the same time, highly likely would overspend your daily budget. My suggestion when using Maximize conversions set a really small daily budget ($50 max).


7. Set the budget you want to spend each day
7.1. Set your average daily budget for this campaign

Budget requirements
Your budget settings affect how quickly we can optimize your campaign for conversions.
For campaigns using Target CPA bidding, it’s recommended to set a budget that’s at least 15 times your target CPA. Use the chart below to understand how long it takes to optimize your campaign depending on the current budget.
| Budget setting | Optimization time |
| More than 15 times your target CPA | 7 to 8 days |
| 10 to 15 times your target CPA | 2 weeks |
| 5 to 10 times your target CPA | 3 weeks |

Google Discovery Ads Targeting
8. Define your Audiences

8.1. Targeting ➜ Define your Audiences, Demographic
NOTE: Adding too many targeting options or restrictions may limit your campaign’s reach.
8.2. Demographics ➜ Select your demographic targeting

With demographic targeting, you can reach people who are likely to be in the demographic groups that you choose, including age, gender, parental status, or household income.
8.3. Interests & detailed demographics ➜ Select audiences to define who should see your ads. You can create new audiences in Audience Manager

Select one of the audience types to define who should see your ads:

I would recommend testing different interests and habits (Affinity) and In-market audiences. For me, Affinity audiences as shown below work the best.


9. Optimized targeting: get more conversions within your budget

Optimized targeting helps you get more conversions within your budget. Google may find people beyond your selected audience.
Information such as your targeting signals, landing page, and assets are used to find people likely to convert. Your targeting signals may see reduced traffic if better performance is found elsewhere.
Ads have seen an average of 20% more conversions by using optimized targeting
Often times Optimized targeting feature can overspend your budget without any conversion, so use it wisely.
If you want to target only specific audience, I would recommend switching the Optimized targeting off in the beginning and switching it on only after your campaign gets optimized.
Othervise you’re risking that all the traffic will go to the Expansion and optimized targeting like on the screenshot below.


10. Create your ads

Discovery campaign allows you creating 2 types of ads:
- Discovery Carousel ad
- Discovery ad

In order to get the best results, I’d recommend testing at least 2 ads in every ad group: 1 discovery ads and 1 discovery carousel ads.

10.1. For Discovery ad complete the fields with all the necessary information:
- 10.1.1. Final URL ➜ Insert your landing page final URL
- 10.1.2. Images and logos ➜ Add at least 1 landscape or square image, 1 portrait image, and 1 logo.
- 10.1.3. Headlines ➜ Add up to five headlines that will be combined with your other assets to generate your ads.
- 10.1.4. Descriptions ➜ Add up to 5 descriptions that will be combined with any one of your headlines to generate your ads.
- 10.1.5. Business name ➜ Add name of your product/brand/business.
- 10.1.6 Call to action text ➜ Choose Call to action text that better fits your campaign goals ➜ Click SAVE
10.2. For Discovery carousel ad you need to create at least 2 carousel cards for better performance:
- 10.2.1. Final URL ➜ Insert your landing page final URL
- 10.2.2. Headline ➜ Add up to five headlines that will be combined with your other assets to generate your ads.
- 10.2.3. Descriptions ➜ Add up to 5 descriptions that will be combined with any one of your headlines to generate your ads.
- 10.2.4. Business name ➜ Add name of your product/brand/business.
- 10.2.5. Images and logos ➜ Add at least 1 landscape or square image, 1 portrait image, and 1 logo.
- 10.2.6. Call to action text ➜ Choose Call to action text that better fits your campaign goals ➜ Click SAVE

11. Discovery Ads Extensions
Recently Google introduced ad extensions to Discovery ads. At the moment there is only only extension type available – Lead Form.
A lead form extension helps you capture interest when people search for your company, products, or services. People can click on your ad to open the form immediately or go to your website.
11.1. Navigate to campaign’s Ads & extensions section ➜ click Extensions ➜ CREATE extension


12. Reconnect with your most valuable customers by remarketing campaigns
Discovery campaigns give you more opportunities to drive the desired action from users who already know your brand and are more likely to engage with it again.
In my opinion, Discovery Campaigns should be definitely used at least as a part of your remarketing funnel cause this type of campaign can help you reconnect with your most valuable leads across Google properties at scale.
Check out the Google Ads Remarketing Lists guide, where you can learn how to setup and use Google’s remarketing features the best possible way.

13. Discovery Ads Optimization Tips And Best Practices

13.1. Optimize The Demographic Performance
Some of your campaign’s audience demographics might work better or worse. It’s worth checking and analyzing what’s your targeting audience’s ideal age and exclude the worse performing.
For example, there are some demographic categories (e.g., “unknown”) and ages (e.g., “25-34”, “65+”) that can become costly after launch.
Navigate to campaign’s Audience section ➜ click Demographics

Exclude bad performing categories of ages

In my case I would exclude the following age categories:
- 18-24 (I exclude this category by default)
- 45-54
- Unknown
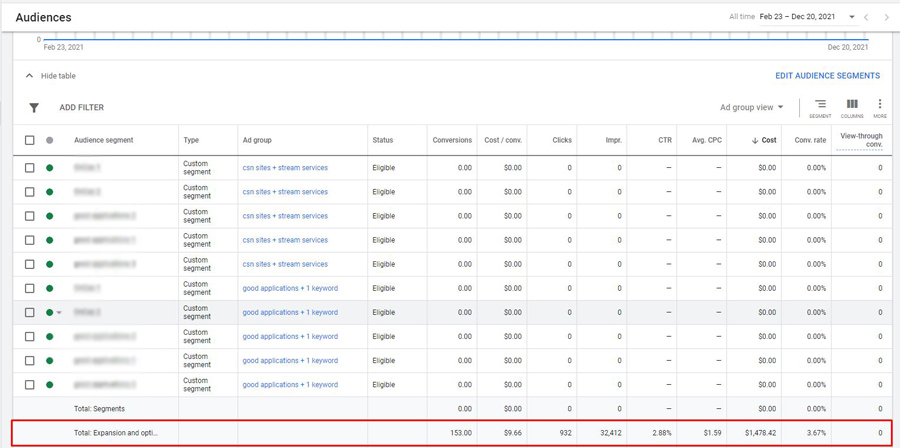
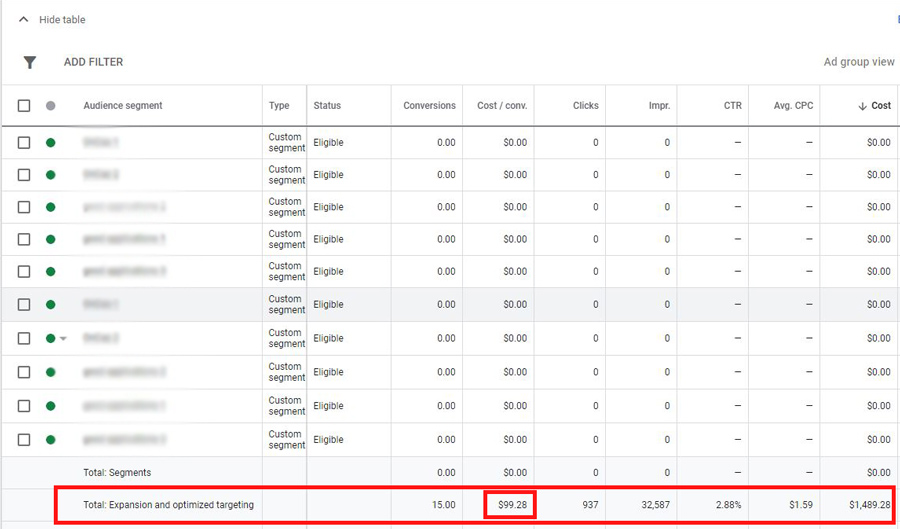
13.2. Check How Well The Optimized Targeting Expansion Work For Your Campaign.
In my practice, Optimized Targeting sometimes showed really good results in terms of performance.
On the screenshot below you can see that Expansion and optimized targeting performed a bit better than other audience targeting:
-
- the CTR was higher: almost twice as much;
- average CPC was lower
- and overall it brought more conversions, last but not least due to much bigger spend.

But sometimes Expansion and optimized targeting can perform quite bad and just spend all your budget without significant results.
In the same time, you wouldn’t get much information where your money went cause it’s showing just the stats (see screenshot below):
As you can see Expansion and optimized targeting spend all the budget by itself and the overall performance was quite bad for me.
In this case I would recommend switching the Optimized targeting feature off.
To do so, navigate to campaign’s Ad group ➜ click Settings ➜ open Optimized targeting option ➜ uncheck Use optimized targeting ➜ click SAVE

Check also my Google Display Ads Complete Guide With Examples Of The Best Practices
P.S. If this article was helpful, or you still have any questions, please drop a line in the comment section below.
Cheers 👋


