Google Ads Guide 2026. Ultimate Guide To Google Ads Advertising
A Step By Step PPC Tutorial On How To Advertise With Google Ads in 2023

When thinking about PPC advertising, the first thing that comes to mind most advertisers is Google Ads.

40,000
Today, Google processes more than 40,000 search queries per second, more than 3 billion daily, and more than one trillion annually. And this growth started strong and has no sign of stopping since the beginning of 2000.
43%
Google reports a 43% increase in total ad revenue for Q3 2021, while it’s expected to exceed $460 billion by 2024.
This guide is designed to help you create your first campaign, write great ads, choose the keywords that will drive quality results, and set the right bid for your ad.
The Google Ads reaches 90% of Internet users worldwide, across millions of websites, news pages, blogs, Search Network, and Google sites like Gmail and YouTube.ads.google.com
In this article, you’ll find a complete guide to advertising on Google Ads. You’ll learn everything there is to know about Google Ads (AdWords) to become a PPC Hero.
Table of Contents:
- Chapter 1. Setting Up Google Ads Account
- Chapter 2. Types of Google Ads Campaigns
- Chapter 3. Google Ads Conversion Tracking
- Chapter 4. Bidding and Budget: Determine Your Bid Strategy
- Chapter 5. Targeting: Test Different Audiences and Placements
- Chapter 6. Similar Audiences
- Chapter 7. Ads and Ad Creatives
- Chapter 8. Google Ads Best Practices And Strategies
- Chapter 9. Remarketing: Types Of Remarketing Across Google Ads
- Chapter 10. Automated Rules: Best Practices
- Chapter 11. Google Ads Campaign Optimization Tips
Skip the Signing Up Step And Jump To Google Ads Campaign Types

1. Signup for Google Ads Account
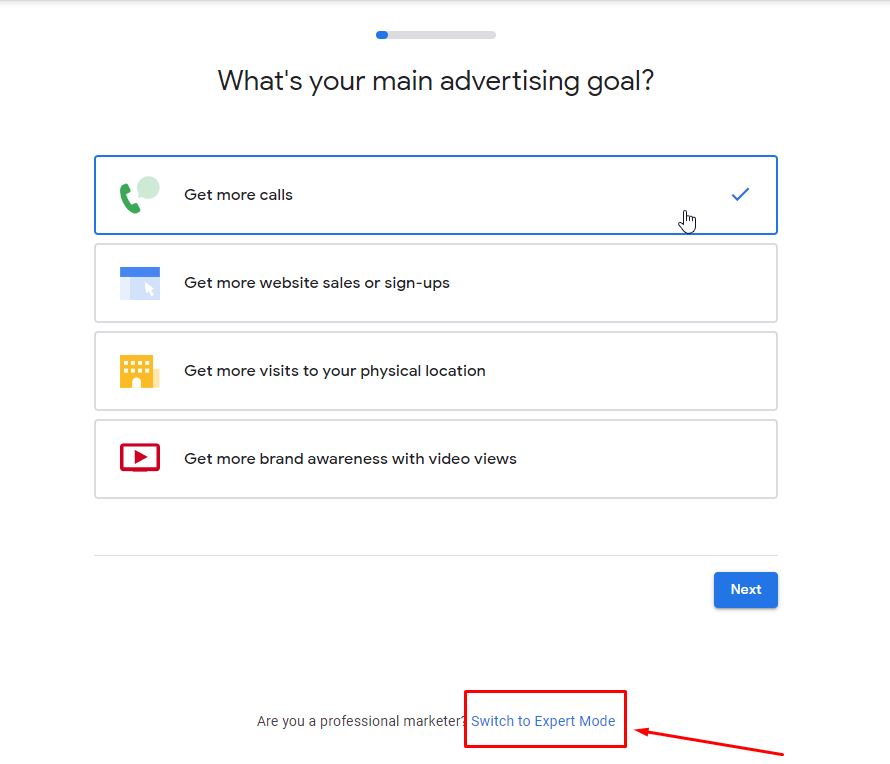
1.1. Navigate to Google Ads ➜ select Switch to Expert Mode
1.2. Click On “Create An Account Without A Campaign”

1.3. Now Fill In Your Billing Country, Time Zone & Currency; Click On “Submit” Button

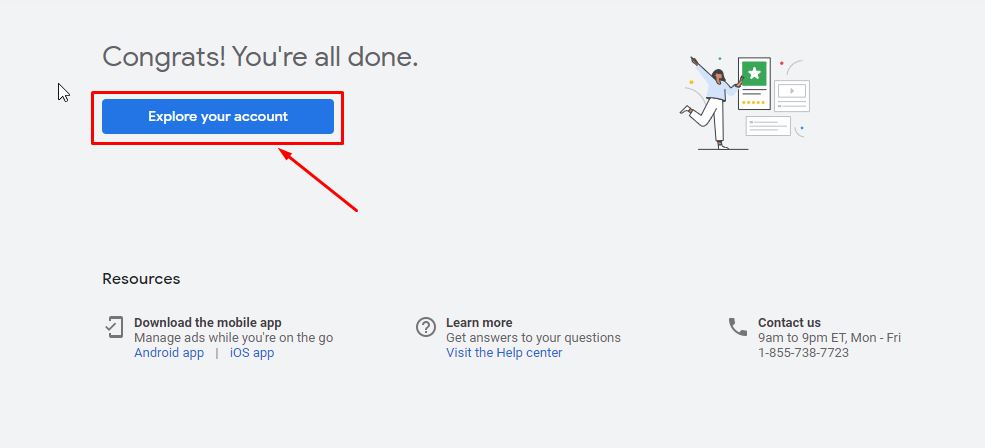
1.4. Your Google Ads Account Is Now Active. Now Click On “Explore Your Account”
Before creating your Google Ads campaign, it’s required to set up the billing first
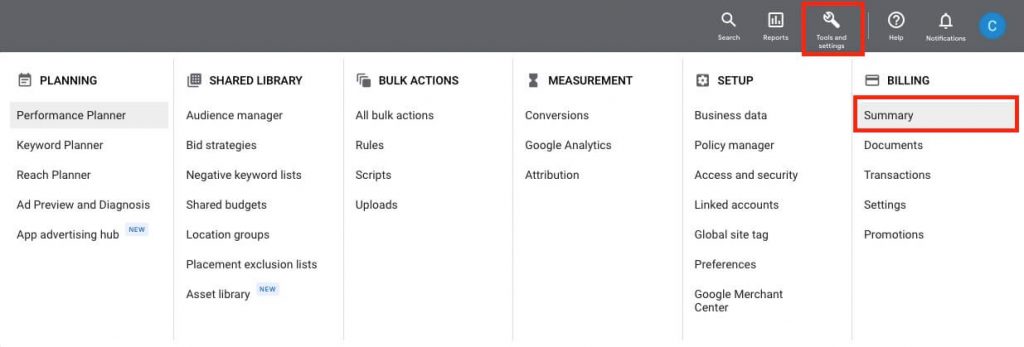
1.5. Click on “Tools & Settings” ➜ Click On “Billing Summary”
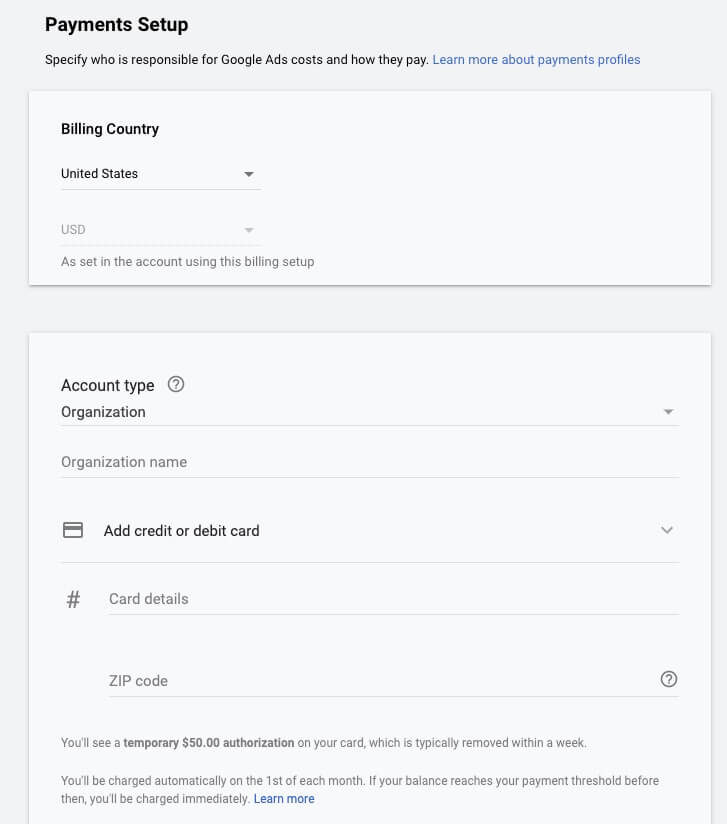
1.6. Fill in the necessary fields with the required payment details and then click the “Submit” button
At this point, you’ve finished with the account setup. You can choose to proceed with creating your advertising campaign.

2. Types of Google Ads Campaigns
With Google Ads, you can reach new customers and grow your business across Google’s most advanced online advertising platforms, such as:
- Google Search Network Campaign,
- Google Display Network Ads,
- Google Discovery Ads,
- YouTube Video Ads,
- Google App Campaigns,
- Performance Max Campaigns.
Skip Conversion Tracking Setup And Jump To Campaign Creation
![]()
3. Google Ads Conversion Tracking: The Basic Setup
Conversion tracking involves generating an HTML code in the Conversion section of the Google Ads account that you insert into your landing page on your website immediately after your lead reaches the conversion event (i.e. “Thank you page”, “Order Confirmation” or “Thanks for Your Email”).
Alright, let’s get started
![]()
3.0. Navigate to Tools and Settings tab ➜ select Conversions ➜+ create Conversion

3.1. Select the kind of conversion to track ➜ select the source of conversion you’d like to track
![]()
Here’s a more detailed walkthrough of the Website conversions source:
Within Websites conversions, you can choose from the following categories:
- Sales categories:
- Purchase
- Add to cart
- Begin Checkout
- Subscribe
- Leads categories:
- Contact
- Submit lead form
- Book Appointment
- Sign-up
- Request quote
- Get Directions
- Outbound click
- More categories:
- Page view
- Other
3.2. Select the appropriate Category ➜ Enter the name of your conversion
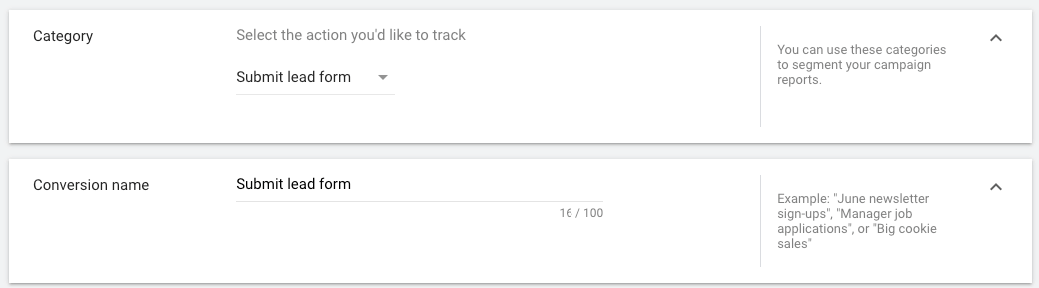
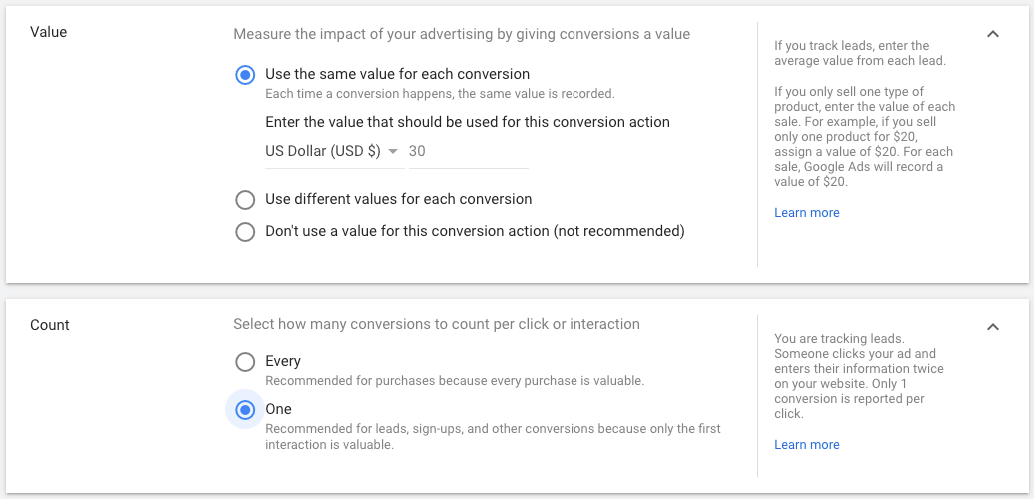
3.3. Select Use the same value for each conversion (if the same value should be recorded for each sale/lead) ➜ Choose a currency and enter the value (amount) of your conversion
3.4. Select the Click-through conversion window

Conversions can happen days after a person interacts with your ad. Select the maximum time after an ad interaction that you want to count conversions.
The conversion window is how long a conversion can be recorded after an ad interaction.
3.5. Select the View-through conversion window

Your view-through conversion window is how long a view-through conversion can be recorded after an impression.
View-through conversions happen after an impression of, not an interaction with, your ad.
3.6. Include in “Conversions”

This setting lets you decide if these conversions should be included in your “Conversions” and “Conversion value” columns. If you uncheck it, data will still appear in the “All Conv.” column.
3.7. Select the Attribution model ➜ and then press Create and Continue

As a definition according to Google, attribution modeling is: “the rule, or set of rules, that determines how credit for sales and conversions is assigned to touchpoints in conversion paths.”
Last-Click Model (Default Model)
When setting up a campaign on Google Ads, you will always be running the last-click attribution model if you have never tweaked your attribution settings.
This is the default setting for Google Ads and Google Analytics.
Last-click is exactly what you’d think it is: giving credit for conversions/sales/ whatever your goal is to the last-clicked keyword or ad, etc.
Source: adespresso.com
3.8. Click Create And Continue
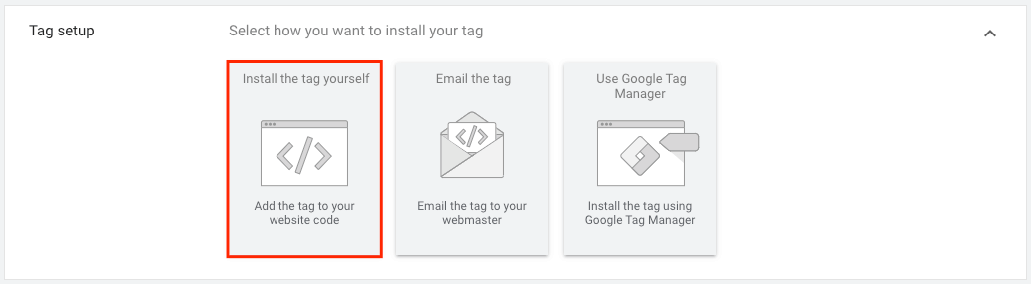
3.9. Tag setup ➜ Install the tag yourself
You’ve created a conversion action. Now, set up the tag to add to your website.
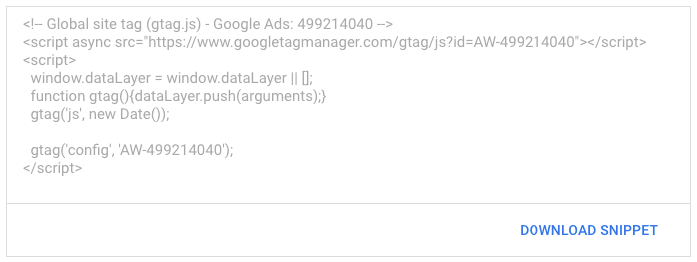
Global site tag
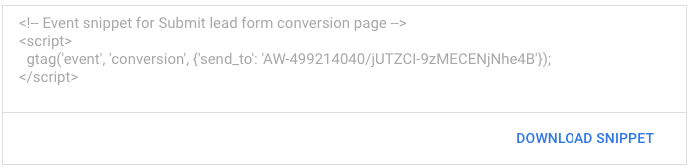
To set up your conversion tracking lead form, paste the global site tag and an event snippet in your page’s code.
Copy the provided tag and paste it between the <head></head> tags on every website page. Or, if you’re using WordPress, paste this code once in the header.php file. You only need to install the global site tag once per account, even if you are tracking multiple actions.
Event snippet
The event snippet works with the global site tag to track actions that should be counted as conversions. Choose whether to track conversions on a page load or click.
Select which event you want to track:
- Page load: Count conversions when someone loads a new page, such as an “Order Confirmation” page or “Thank you page”;
- Click: Count conversions when customers click a button or link (such as a “Buy Now” button).
Copy the provided snippet and paste it in between the <head></head> tags of the page(s) you’d like to track (i.e. “Thank you page, right after the global site tag.
Things to note:
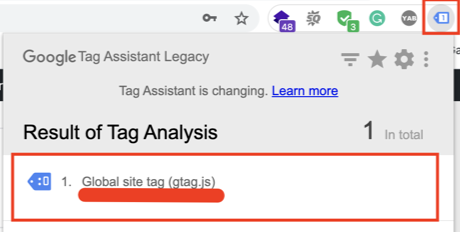
- It might take a few hours to verify that the tag is on your website. Check the tracking status on the “Conversion actions” page to ensure your tag is working.
- You can also use the Google Tag Assistant plugin for Chrome to make sure your tag is working.
- You can edit conversion actions at any time on the conversions page.
Learn more about Google Ads Conversion Tracking.

4. Bidding and Budget: Determine Your Bid Strategy

4.0. In the bidding section, select bid strategy directly ➜ Select Manual CPC
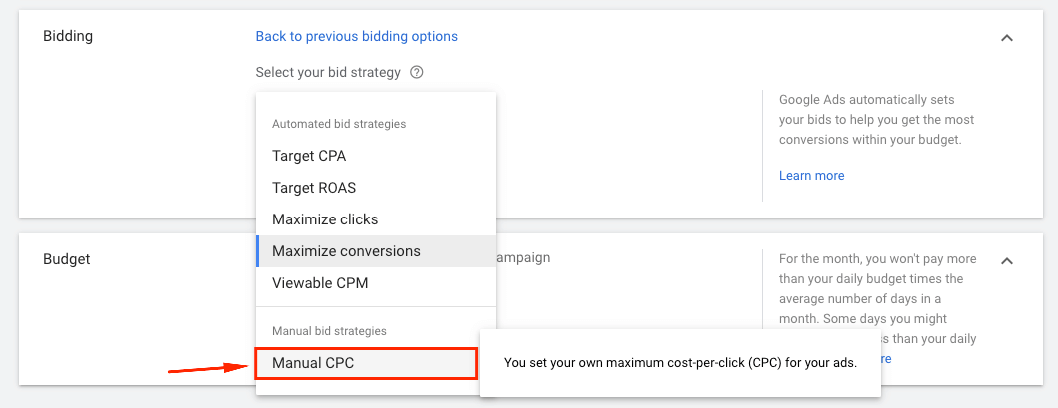
If you’re launching a brand new Display campaign, I’d recommend starting with the Manual CPC bidding to have more control over your bids and spending.
After optimizations and some time of running, you might switch your campaign bidding to Automated bid strategies as follows:
- Target CPA
- Target ROAS
- Maximize clicks
- Maximize conversions (be cautious with this type of bidding cause it most likely overspends your budget)
- Viewable CPM
4.1. Help increase conversions with Enhanced CPC
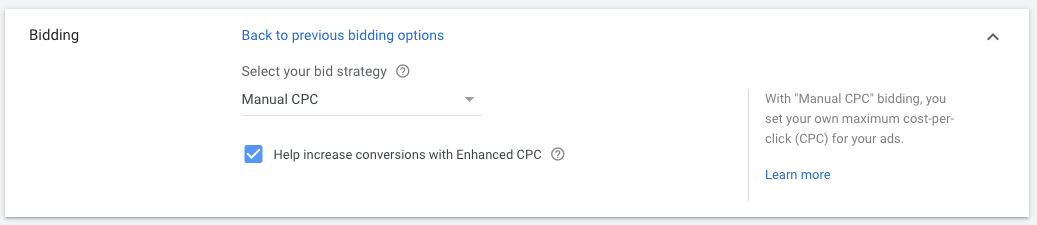
PRO TIP: A lower cost per click (CPC) isn’t always better.
Because Google Ads works in an auction system, the price fluctuates depending on how much advertisers are willing to bid.
When bids are higher it’s likely (not guaranteed) they can afford to bid higher because the ad is more likely to convert and turn into a sale – and therefore produce a good ROI.
4.2. Set your daily budget

4.3. Budget requirements for Target CPA bidding type
For campaigns using Target CPA bidding, it’s recommended to set a budget at least 15 times your target CPA. Use the chart below to understand how long it takes to optimize your campaign, depending on the current budget.
| Budget setting | Optimization time |
| More than 15 times your target CPA | 7 to 8 days |
| 10 to 15 times your target CPA | 2 weeks |
| 5 to 10 times your target CPA | 3 weeks |

5. Targeting Options: Test Different Audiences and Placements
5.0. Create your ad group ➜ Ad group name

Within Google Ads, you can choose from the following targeting options and types:
-
- Keyword targeting
- Placements
- Topics
- People and audiences targeting
- Demographic targeting:
- Gender
- Age
- Parental status
- Household income
- Detailed demographics:
- Parental Status
- Marital Status
- Education
- Homeownership Status
- Employment
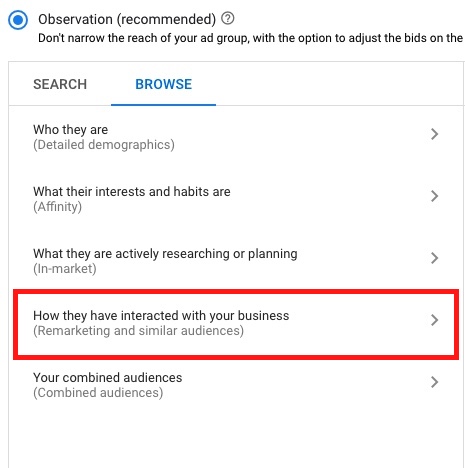
- What their interests and habits are (Affinity interests)
- What they are actively researching or planning (In-market interests and life events)
- How have they interacted with your business (Remarketing and similar audiences)
- Custom Audiences:
- People with any of these interests or purchase intentions
- People who searched for any of these terms on Google
- People who browse types of websites
- People who use types of apps
- People who visited certain places
- Demographic targeting:
5.1. Keyword targeting for Search campaigns

5.1.1. Keywords ➜ Enter relevant keywords
Keywords are words or phrases that match your ads with the terms people are searching on Google.
Keyword Match Types
The keyword match types dictate how closely the keyword needs to match the user’s search query for the ad to be considered for the auction.
So you could use a broad match to serve your ad on a wider variety of user searches, or you could use an exact match to hone in on specific user searches.
Match types help control which searches can trigger your ads. Types of keywords matches:
- Broad match = keyword
- Phrase match = “keyword”
- Exact match = [keyword]

Broad match
The syntax for the broad match is to input the keyword. Below is an example of how a broad match will work:

Phrase match
The syntax for phrase match is to put quotes around your keyword, such as “tennis shoes.” Below is an example of how to phrase match will work:

Exact match
The Exact match is designated with brackets, such as [red shoe]. Below is an example of how an exact match will work:

Matching the most relevant keyword to every search (Google newest update)
Previously, when you had multiple keywords that were eligible to match, and none were identical to the search, your Ad Rank would determine which keyword served. Now, Google considers relevance signals in addition to Ad Rank when determining which keyword is selected.
Relevance is determined by looking at the meaning of the search term, the meaning of all the keywords in the ad group, and the landing pages within the ad group.
Here’s how it works:
| Eligible keywords | How keywords are selected |
| More than one broad match keyword | Only relevant broad-match keywords from the most relevant ad groups will be considered. Ad Rank is then used to decide which keyword will be selected among this narrow set of broad match keywords with similar relevance. |
| One broad match keyword and one exact match/phrase match keyword | If you have exact match or phrase match keywords deemed more relevant than these broad match keywords, the exact or phrase match keyword will be selected. If you have exact match or phrase match keywords deemed similar or less relevant than these broad match keywords, there is still a chance the exact or phrase match keyword will be selected if it has a higher Ad Rank. |
| More than one exact match/phrase match keyword | If you have multiple exact and/or phrase match keywords eligible and no broad match keywords eligible, the keyword with the higher Ad Rank will be selected. |
For example, let’s say someone now searches for “quick sushi delivery near me”, and you have the phrase match keyword “fast sushi delivery” and the broad match keyword food delivery. In this instance, the phrase match keyword will be selected because it’s more relevant, even if it has a lower Ad Rank than the broad match keyword.
These rules ensure that the most relevant keyword will always be prioritized, so you can use broad matches more easily and maintain control.
Best Keyword Grouping Structure
Based on the newest Google update, Google now recommends you group keywords into thematically consistent ad groups so your ads will serve from the ad group you expect them to.
For example, your business offers food delivery, and your most popular search categories are sushi and pizza delivery.
In this case, Google recommends three ad groups so you can tailor your creative and landing page:
- one for “sushi delivery,”
- another for “pizza delivery,”
- and a third for “food delivery”
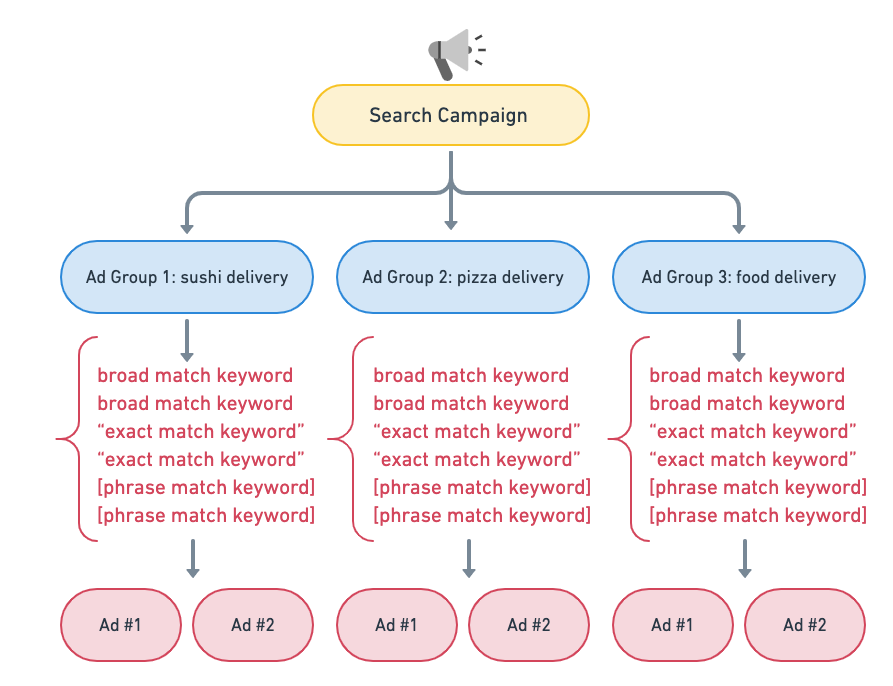
This structure gives you more control over which keyword matches a search query, particularly when using broad-match keywords. It can also help reduce campaign optimization complexity: by prioritizing the most relevant keyword for every search, there’s no need to do extra work to control where traffic goes within your search campaign.
Check out Google Ads Keyword Research Guide for the best keyword research for your PPC campaigns.
5.2. Audiences, Demographics (People: who you want to reach)
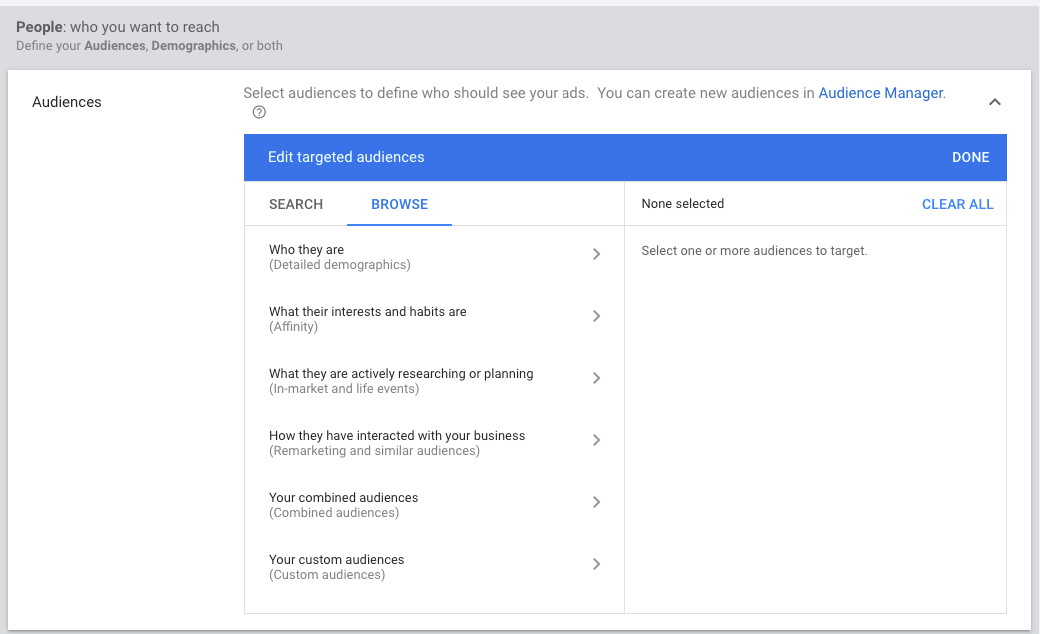
Audiences are groups of people with specific interests, intents, and demographics, as estimated by Google. They’re people you can show your ads to.
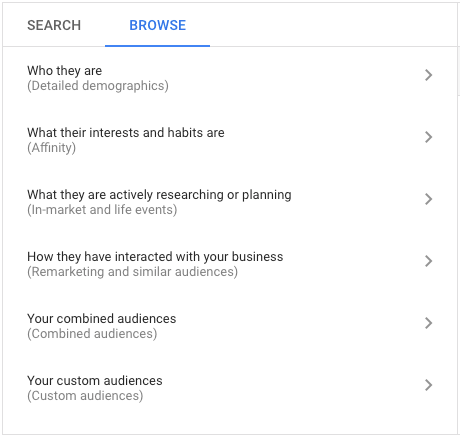
Select one of the audience types to define who should see your ads:
The image below may help you choose the best audience type for your campaign goal.
Source: eppcdigital.com
❗ I would suggest picking one audience type per ad group for accuracy and an easier optimization process. You may also skip the audience targeting and proceed to the next steps if you wish to target just specific placements (i.e. websites/apps/app categories/youtube channels/youtube videos)
Data from your audience sources may be used to improve the bidding and targeting of your audience campaigns.
Related to Audience Targeting: Installed App Category Targeting
TIP: Adding too many targeting options or restrictions may limit your campaign’s reach.
5.2.1. Demographics (Reach people based on age, gender, parental status, or household income)
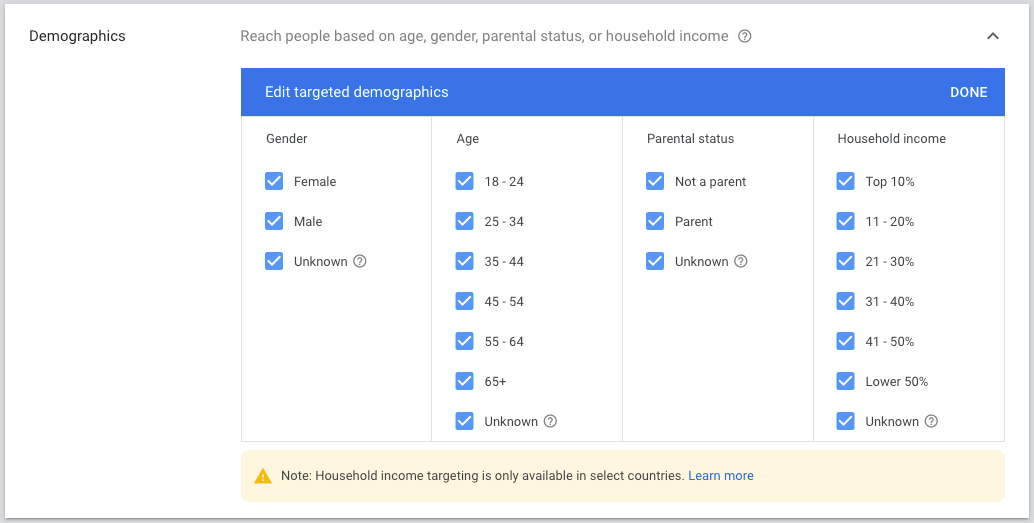
With demographic targeting, you can reach people who are likely to be in the demographic groups that you choose, including age, gender, parental status, or household income.
Later, you can manage your demographics in your campaign’s Audience section ➜ Demographics
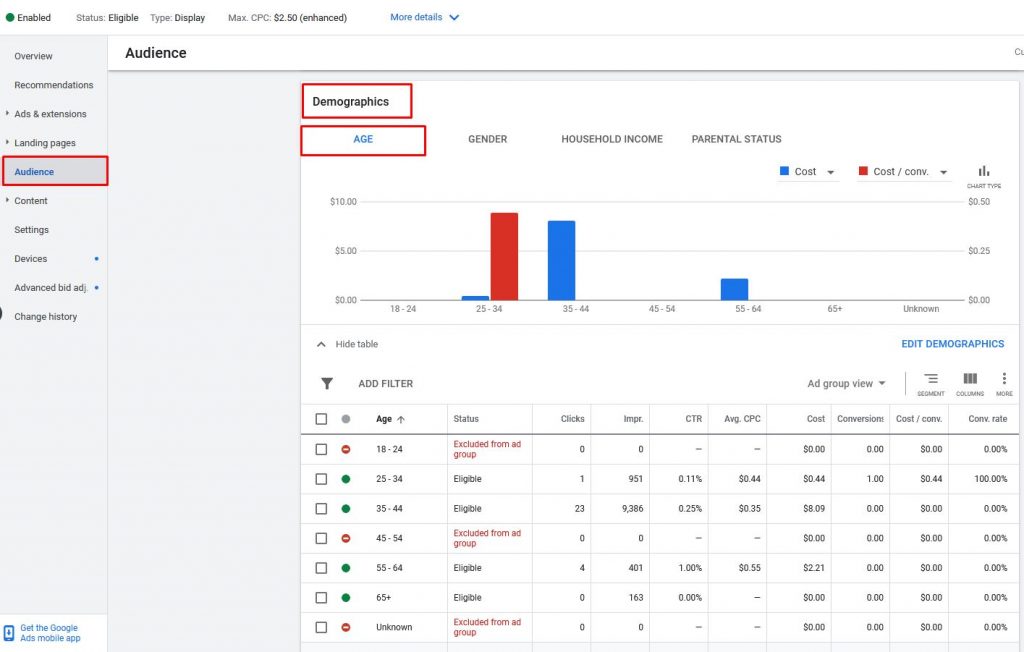
For instance, you can exclude specific Age, Gender, Household Income which doesn’t perform well for your campaign.
Content Targeting
5.3. Content: where you want your ads to show
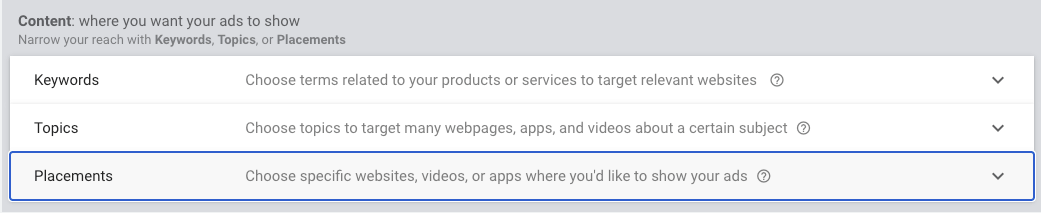
Narrow your reach with:
- Keywords (Keyword targeting lets you choose words or phrases related to your products or services. The keywords you choose help show your ads on relevant websites, apps, and videos);
- Topics (Topics are based on broad industries or interests, such as agriculture or music.);
- or Placements.
Pro Tip: For Google Display Network Ads, keep your keyword list small, around 5-20 very related keywords and phrases that are highly relevant to your ad content.
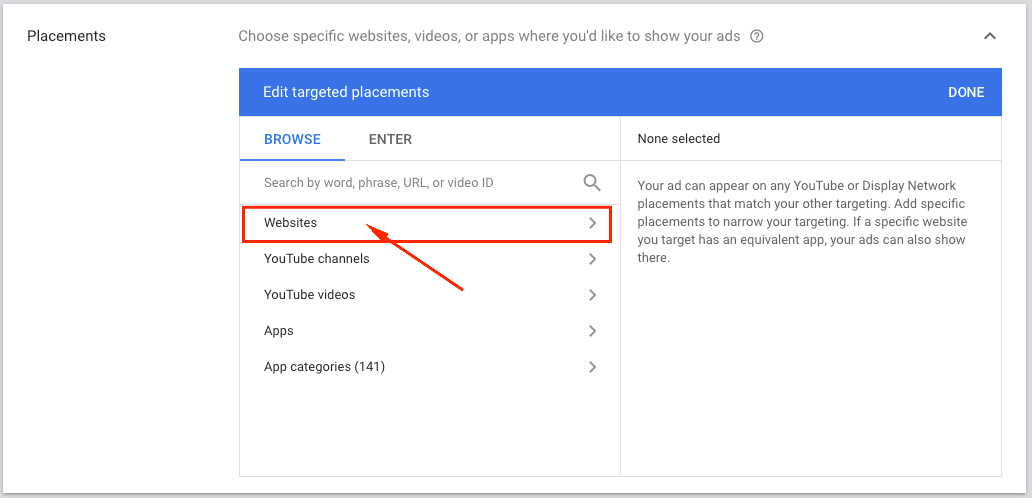
Placements
Website placements
In the placement section, you can choose specific websites, videos, or apps where you’d like to show your ads.
Let’s say you have a list of websites where you’d like your ads to be shown.
Then you should:
Navigate to the Placements ➜ Websites tab ➜ Enter the list of desired websites ➜ Add placements


Targeting or Observation option?
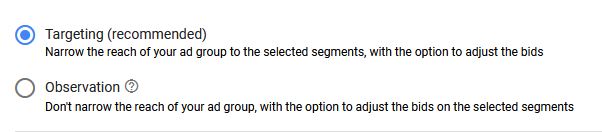
When adding placements or audiences you can choose from 2 options:
- Targeting
- Observation
I would recommend going with the Targeting option, especially if you’d like to show your ads only on specific placements from the list you’ve added. Thus your ads will be shown only within the placements you’ve added to the list.
Otherwise, if you’d like to expand your reach and find new audiences for your business, you can go with the Observation option.
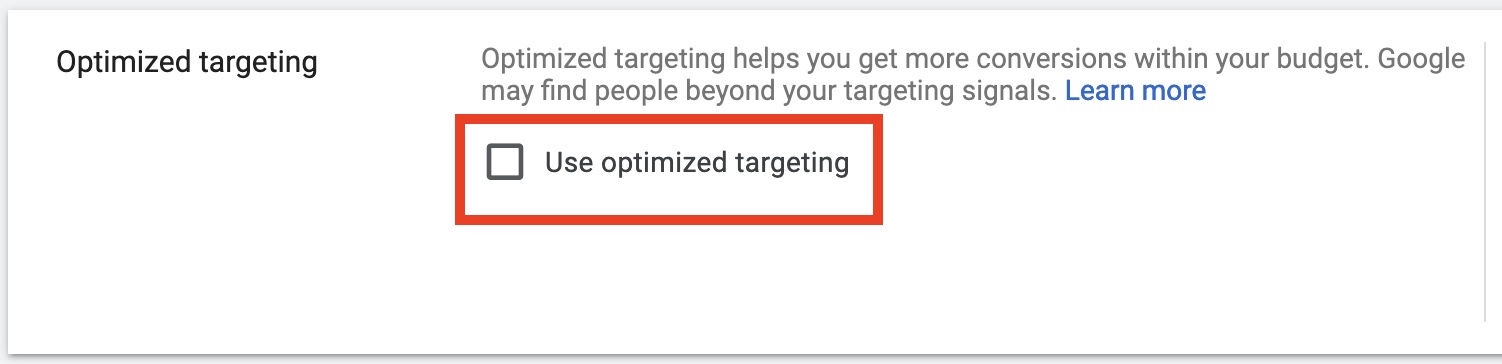
Optimized targeting

Optimized targeting helps you get more conversions within your budget. Google may find people beyond your targeting signals.
This means, when selecting this option Google will show your ads to audiences and in placement beyond your targeting, and it may lead to a worse performance sometimes,
PRO TIP: Leave the Optimized targeting option unchecked if you’d like to target only specific placements without expansion of your reach
If you’d like to target only specific placements, such as specific websites, it’s important to uncheck the Optimized targeting option.
Otherwise, Google will ignore your specific placements for targeting, and your ads will be shown on different placements as well.
Where to find Optimized targeting option:
Navigate to your campaign’s ad group ➜ in the Settings click Edit ad group targeting

Expand Optimized targeting settings ➜ Uncheck Use optimized targeting

NOTE: Targeting expansion is now available as Optimized targeting for any new Display campaigns that you create. Like targeting expansion, optimized targeting looks at any audience segments you’ve added to your targeting and uses that as a starting point to find new and relevant audiences for the campaign.
Learn more about Google Ads Targeting Options And Best Practices
Similar audiences
According to Google, by combining Similar Audience targeting with remarketing, you can increase conversions by up to 41%.
Navigate to Similar Audiences section to learn how to set up and utilize this feature.

5.4. Targeting expansion
Increase your reach based on the positive targeting and the settings selected above
Reach more users by letting Google look for high-performing audiences similar to your target. Expanding reach can increase impressions, clicks, and conversions.

NOTE: Targeting expansion is now available as Optimized targeting for any new Display campaigns that you create. Like targeting expansion, optimized targeting looks at any audience segments you’ve added to your targeting and uses that as a starting point to find new and relevant audiences for the campaign.
PRO TIP: If you want to target only specific placements in your display campaign, better turn this feature off. Otherwise, your ads will be shown on different placements, other than you’ve targeted

6. Similar Audiences
Similar audiences are created by Google from your remarketing audience (mentioned above). Basically, it’s a kind of look-a-like feature.
How it works
Google Ads looks at the recent search activity of the visitors in your remarketing list to help aggregate the search behavior of the visitors in your list. Based on this information, the system automatically finds new potential customers whose search behavior is similar to that of people in your remarketing list.
As we’ve mentioned before, according to Google, by combining your Similar audiences with remarketing audiences, you can increase conversions by up to 41%.
Keep in mind
A similar audiences list is automatically created from a remarketing list or Customer Match list with at least 1,000 cookies with enough similarity in search behavior to create a corresponding similar audience.
Where to find similar audiences?
Navigate to Tools and Settings tab ➜ select Audience manager ➜ click on the Segment section ➜ now you can find a Similar audience in the DATA SEGMENTS section

Learn how to create and add similar audiences to your targeting.

7. Ads and Ad Creatives
7.1. Create Google Search Ads
Start with creating a Responsive search ad
With responsive search ads, you enter multiple headlines and descriptions, and Google combines them into ads.
Why use Responsive Search Ads (RSA)?
- Responsive Search Ads were receiving 8 – 60 % more impressions than ETAs for most of the accounts I was managing.
- Working to reach a high ad strength for RSAs (higher than average) led to 74 – 400 % more conversions with 33 – 37% lower cost per acquisition (CPA).
- If the RSAs had an ad strength lower than average, the ads were less frequently triggered even though ETAs had higher priority and better KPIs.
Complete the fields with all necessary information:
- Add the Final URL
- Display path

- Keyword insertion in Display path
- To use this feature in your ads, you insert a special piece of code into your ad text. For example, let’s say you’re running a campaign to advertise your candy store and you have an ad group that promotes your chocolate candy products. The snippet of code that you’ll insert in your ad text might look like the following: {KeyWord: Chocolate}. Doing this means that when a keyword can’t be inserted in your ad, we’ll insert Chocolate instead.
- You can also dynamically insert the user’s location in the Display path. To do so insert {LOCATION(City): United States}.
- Add up to 15 Headlines
- Add up to 4 Descriptions
 Click SAVE and publish your campaign for review
7.2. Google Display Ad Creatives: Responsive or Fixed-size Uploaded Ads. Create your ads
Standard Google Display campaign allows the creation of 2 types of ads:
- Responsive display ads
- Fixed-size display ads, which you should upload manually
7.2.1. Responsive display ads
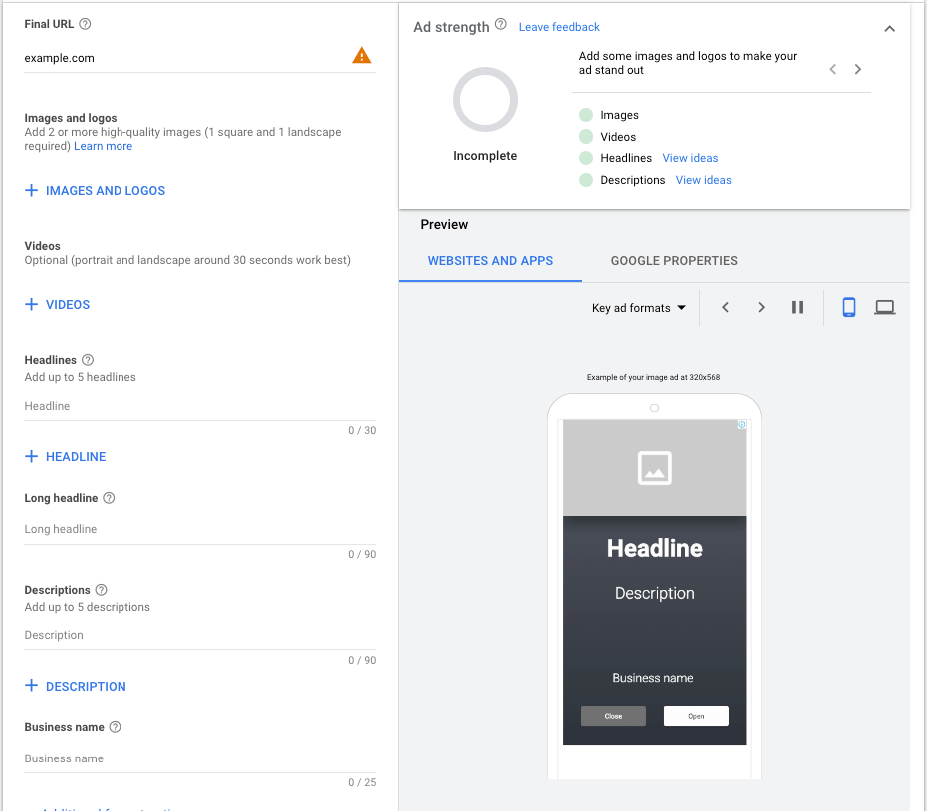
Responsive display ads can increase your reach and save time spent creating different versions of your ads.
When you create a responsive display ad by uploading different assets into Google Ads, Google uses a machine learning model to determine the optimal combination of assets for each ad slot based on predictions built from your performance history.
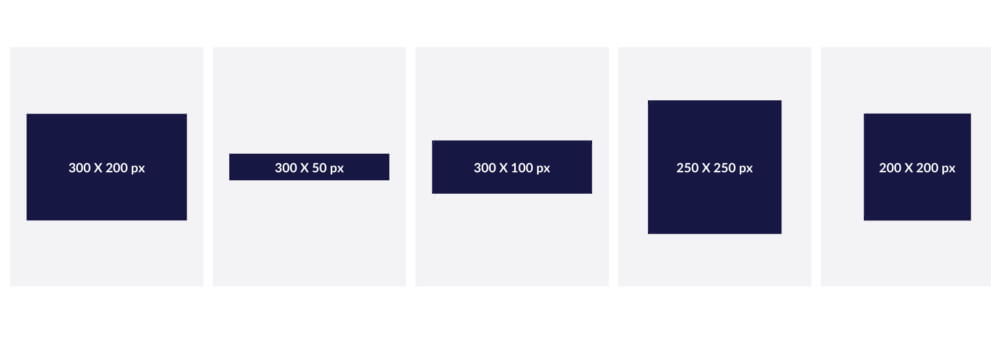
Responsive Mobile Ad Sizes
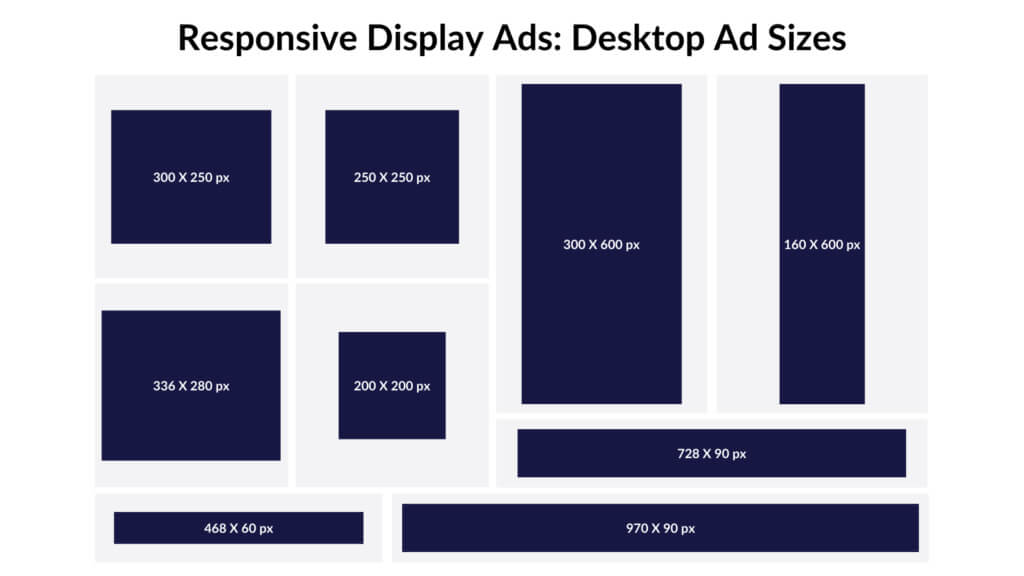
Responsive Desktop Ad Sizes
Complete the fields with all necessary information:
- Add the Final URL
- Add Images and logos
- Add up to 20 videos
- Add up to 5 headlines
- Add a Long headline
- Add up to 5 descriptions
- Add a Business name
Click SAVE
Responsive Video Ads

Google responsive video ads are part of display network ads, where advertisers can add up to 5 videos. These video ads will trigger in a display ad unit.
Responsive ads automatically adjust their appearance, size, and format to serve on available ad inventory on the Google display network.
How to use Google Responsive Video Ads?
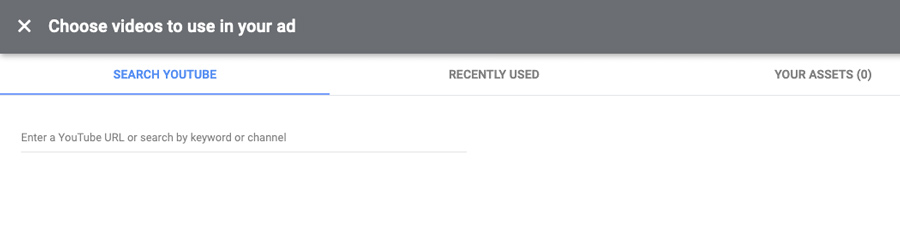
Enter a YouTube URL to define video in your ad unit asset. You can search for videos within the screen as below and can add up to 5 videos. Google will auto-rotate these videos and show high-performing video ad sets often.

Learn more about Google Video Ads Complete Guide 2021 & Best Practices
7.2.2. Fixed-size Uploaded Display Ads
If you don’t want to use Responsive ads but want just fixed-size ads, navigate to your campaign Ads & Extensions menu section ➜ click + Create Ad ➜ Upload display ads

Enter your landing page URL ➜ Choose your display ads that you want to upload ➜ click DONE


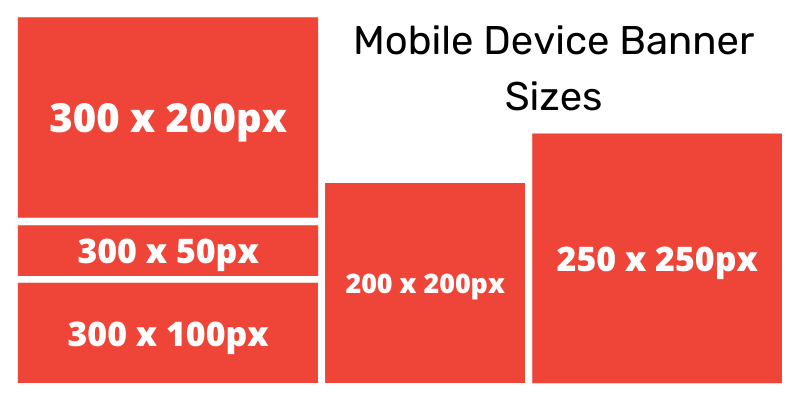
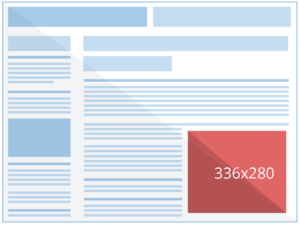
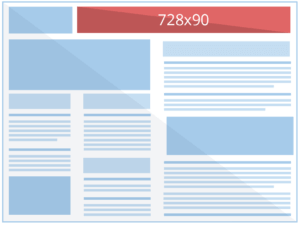
Best Performing Google Ads Display Sizes
We’ve listed the top five best-performing banner ad sizes according to Google. The picture next to each size shows you the location and relative size on the page.
1. Medium Rectangle (300×250)

2. Large Rectangle (336×280)
3. Leaderboard (728×90)
4. Half Page (300×600)
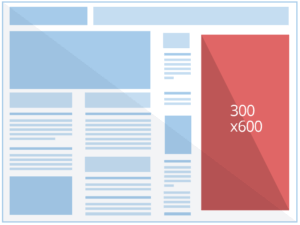
5. Large Mobile Banner (320×100)

Pro Tip #1: Create Ads in every possible format and find out which one works best for your product or service. Google suggests 5-10 images per aspect ratio.
Pro Tip #2: Create 3 to 4 ads per ad group, trying out different messages with different images. See which ad performs the best with your customers. Google Ads can automatically show the better-performing ads within an ad group more often. This removes the guesswork and lets you build on what you’ve learned from your experiments.
AMPHTML, and HTML5
HTML5
Requirements for using HTML5 ads
You should be able to gain access to HTML5 ads in your Google Ads account once your account has generated sufficient history on our platform and has met the following requirements:
- Account has been open for more than 90 days.
- Account has more than USD 9,000 total lifetime spend.
- Account has a good history of policy compliance.
Keep in mind, that meeting the requirements above doesn’t always guarantee access to HTML5 ads.
If HTML5 ads are unavailable in your account, you can apply for access via google’s form. Before you submit your application, make sure that your account meets the eligibility criteria listed below. You will receive an email notification with a status update within 7 business days of your application submission.
- Account has a good history of policy compliance.
- Account has a good payment history.
- Account has more than USD 1,000 total lifetime spend.
If you’re looking to create HTML5 ads, you may use the Google Web Designer platform which will help make you make different-size advertisements, which means that Google will show your ads in a variety of sizes and aspect ratios.
AMPHTML ads
You can build ads with AMP (Accelerated Mobile Pages). AMPHTML ads load faster than regular ads, which makes them ideal for mobile devices.
Benefits
- AMPHTML ads have a reduced file size that increases the speed of the rendering process.
- AMPHTML ads are verified before being served to prevent malware, for a safe user experience.
- Faster ad displays can lead to a higher click-through rate because users are able to view the loaded ad instantly.
- The ads can run on any device, including non-AMP pages and AMP pages.
- It is impossible to spread malware with AMPHTML ads.
- Faster and lighter ads often lead to a boost in campaign ROI.

8. Google Ads Best Practices And Strategies
You could use Google Search Network and Display Ads to keep them as distinct as possible by analyzing users’ intent to them towards your goals. Frame your visuals and ad copy accordingly to hit the right spot in the consumer psyche.
Remember that Search Ads work best when pushing a product, whereas Display Ads and Video Ads are a medium for creating general awareness for your brand and boosting product recollection.

Here are the best tips and tricks to maximize ROI and improve quality scores through Google Display Ads.
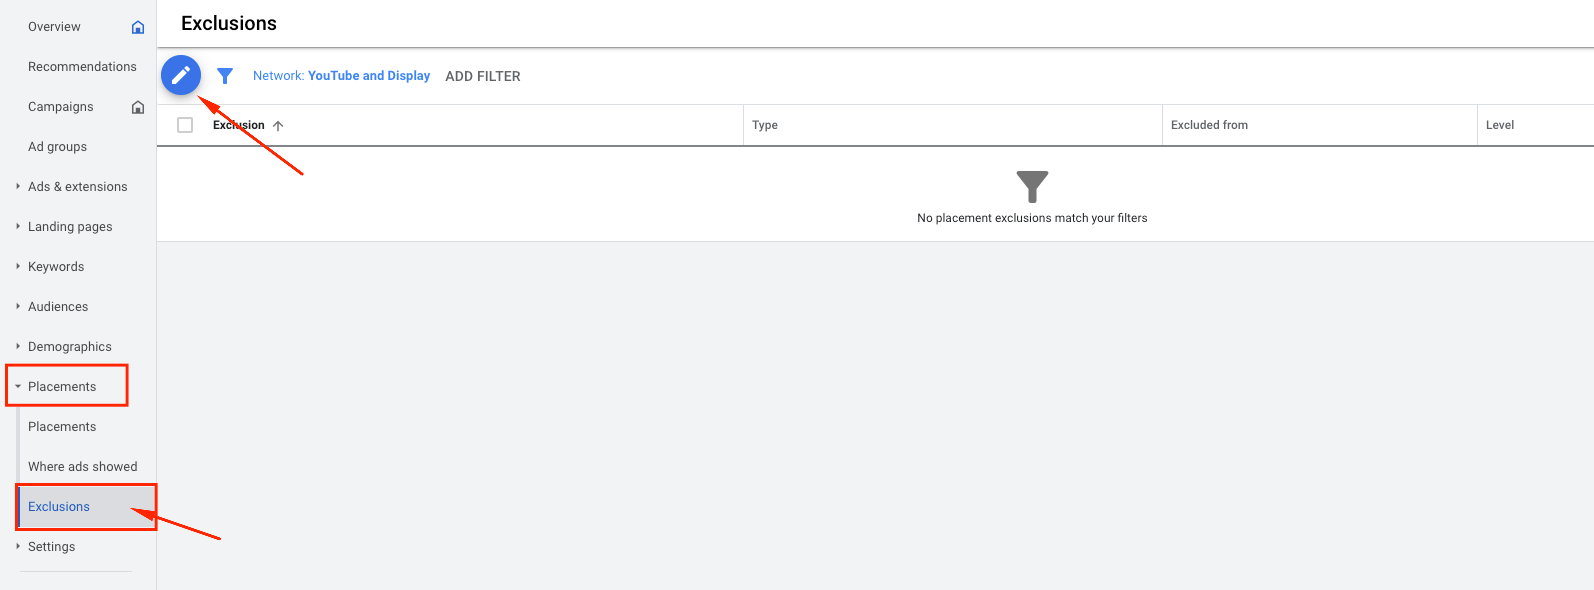
8.1. Exclude apps
If you don’t like to show your ads in Apps, you can exclude the them in campaign Exclusions setting.
I would strongly recommend excluding apps from the beginning if you’d like your budget spending to go smoothly because there’re many apps that are developed for the purpose of earning money from just clicking on ads.
After you’ll set your campaign, navigate to Placements ➜ Exclusions and exclude all the app categories from your targeting, cause they may spend all your budget without any significant results.
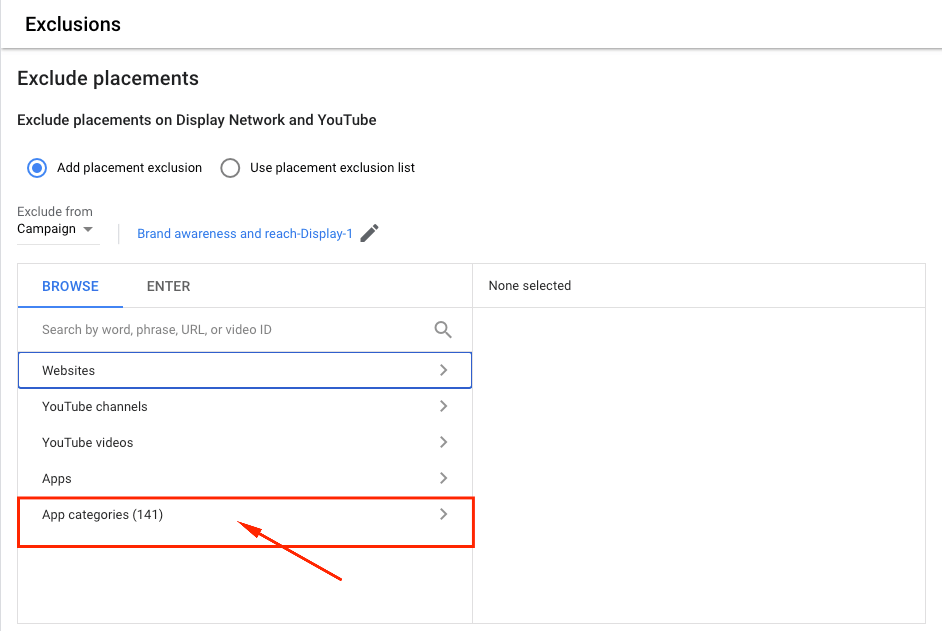
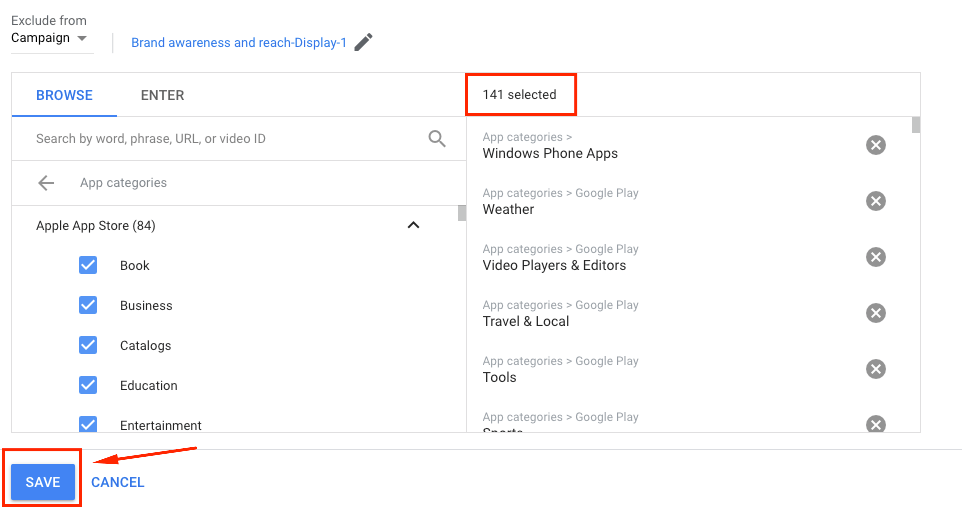
In the opened window choose your campaign from which you’d like to exclude placements ➜ Click App categories (141) ➜ Check all categories in the list in order to exclude them from your campaign (it’s 141 app categories to exclude, I know it’s awful, but it’s the only way to get rid of useless spending).
Make sure to open all the lists and check every single category.
8.2. Ad Frequency Management: Control The Maximum Amount Of Time Users See Your Ad On Google Display Network
In Google Ads, you can set a preference for how often your ads are shown to the same user per day, week, or month. As these numbers change, monitor how your CTR, conversions, conversion rates, or other KPIs (again depending on the campaign’s goals) change as your unique user and frequency numbers change.
Frequency capping helps control the maximum number of times an individual user sees your ad on the Display Network.
You can then use this data to update your frequency capping settings in your Display Network campaigns.
In your Google Display Network campaign settings, navigate to the Settings option. There, you will see the Frequency management section:

In my experience, it’s best to set a daily cap of 5 impressions per day per single user.

8.3. Exclude kids/children topics
I found it very useful to exclude children/kids-related topics if it doesn’t represent your target audience. It works pretty well, especially for news campaigns, that haven’t been optimized yet.
Below you can find a complete list of kids/children-related topics for exclusion:
- Baby Safety
- Baby Strollers & Transport
- Baby & Toddler Toys
- Baby Feeding
- Babies & Toddlers
- Baby & Pet Names
- Baby Care & Hygiene
- Children’s Clothing
- Children’s Literature
- Kids’ Bikes
- Early Childhood Education
- Homeschooling
- Parenting
- Child Care
- Pregnancy & Maternity
- Family-Oriented Games & Activities
- Toys

9. Remarketing: What Types Of Remarketing Can Be Used On Google Ads
On the Google Display Network, you can target in two ways. First, you can target leads on the internet who may have no previous knowledge of your website, brand, products, or services. Second, you can remarket to users who have engaged with your website in some form.
Remarketing is a way to connect with people who previously interacted with your website or mobile app. It allows you to strategically position your ads in front of these audiences as they browse Google or its partner websites, thus helping you increase your brand awareness or remind those audiences to make a purchase. And by the way, retargeting with display ads have a high ROI.
Remarketing campaigns can lead to a 147% greater increase in revenue.
There are 2 retargeting options available with Google Display Ads:
- Standard remarketing: Show ads to your past visitors as they browse sites and apps on the Display Network.
- Dynamic remarketing: Boost your results with dynamic remarketing, which takes remarketing to the next level with ads that include products or services that people viewed on your website or app.
The main difference between these 2 types of remarketing campaigns is the following: while traditional remarketing targets your past visitors with static ads, dynamic remarketing goes a step further.
Dynamic remarketing
Dynamic remarketing campaigns show your previous website visitors tailored and more personalized ads based on products or services they viewed on your website. These campaigns provide you with extra settings and reports specifically for reaching previous visitors.
How to create a dynamic remarketing campaign for Display
- First of all, you need to Upload the feed
- Click on TOOLS AND SETTINGS ➜ SETUP ➜ Business data
- In Data feeds window click the plus icon +, Choose Dynamic ad feed ➜ Choose your business schema and upload the file
- Then create your Display ads campaign
- In Additional settings click on the down arrow for “Dynamic ads”
- Check the box beside “Use dynamic ads feed for personalized ads”
- Click Save
Standard remarketing
Some of the most common standard remarketing audiences include:
- General website visitors
- Users who have submitted a form
- Users who have downloaded content
- Users who have viewed specific product pages
- Users who have signed up for an account or trial offer
- Users who have completed a transaction or purchased a product
- Users who have begun any of the above actions but abandoned the page before completing it
Learn more about Remarketing and Best Remarketing Practices
9.1. Remarketing Lists for Search Ads (RLSA)
Remarketing of your previous visitors is effective since prospects need to see your ad at least seven times before they become a customer.
Remarketing lists for search ads (RLSA) is a Google Ads feature that allows advertisers to tailor their search campaigns based on whether a user has previously visited their website (or app), and the pages that the user viewed.
RLSAs can be used in two ways:
- Making bid adjustments on your ad groups for users (remarketing lists) who are searching on Google using the keywords you are bidding on
- Set up search ad groups to only be triggered and show ads if a user is on your Remarketing list, and is searching with the keywords you are bidding on
How To Set Up Remarketing Lists for Search Ads
In order to create RLSAs, you’ll need to set up the Google Ads Remarketing Tag first.
1. Navigate to the Tools & Settings icon in the upper right corner of your account ➜ Click Shared Library

2. Click Audience Manager ➜ Audience sources
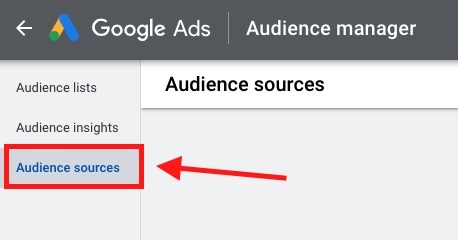
3. Under the Google Ads tag section click Set Up Tag

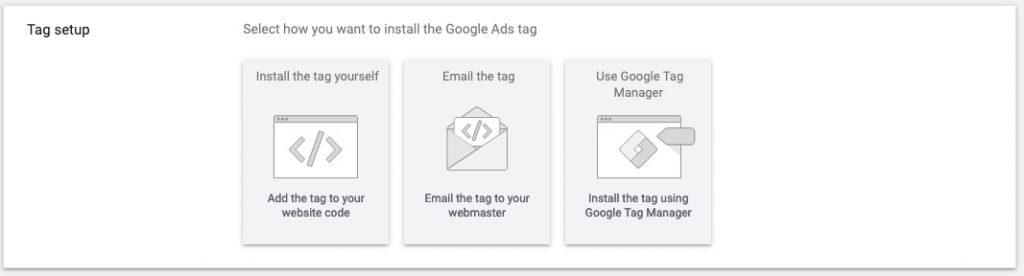
Select how you want to install the Google Ads tag:
- Add the tag to your website code
- Email the tag to your webmaster
- Install the tag using Google Tag Manager
If you choose to Install the tag yourself, then copy the given tag and paste it in between the <head> </head> tags of every page of your website.
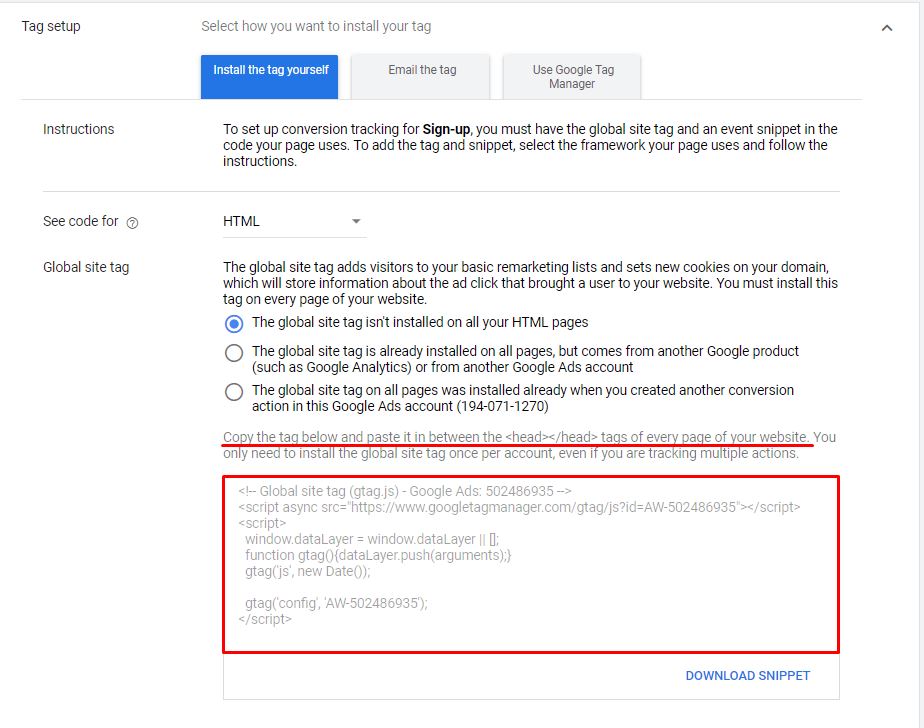
You only need to install the global site tag once per account, which can be used with both remarketing event snippets as well as conversion event snippets.
Setting up remarketing lists for RLSA
1. Go to the Shared Library ➜ Audiences Lists ➜ Remarketing
2. Click the plus icon + Remarketing button to create a remarketing list
Select the type of visitors from which you’d like to create a segment (Remarketing list)

Remarketing Lists Best Practices
The most common practice of remarketing lists is to retarget people who visited check-out page but didn’t purchase your product (thus, haven’t reached your Thank You Page).
To do so:
- select Visitors of a page who did not visit another page
- in the Visited page section insert your product’s check-out page tag
- in the Unvisited page, section insert your thank-you page tag

Adding a remarketing list to a search campaign ad group
These instructions assume you’ve already created your search campaign and ad groups that you’d like to use with your remarketing lists.
- To add Remarketing List to your Google Search campaigns navigate to the Audiences section of your campaign and click plus icon + Add Audiences
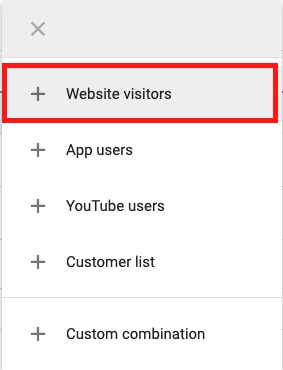
- Click Browse ➜ Select Remarketing and similar audiences
- Go to Website visitors ➜ Choose your created list

10. Automated Rules: Best Practices
Automated rules let you make changes in your account automatically, based on the settings and conditions you choose. You can change your ad status, budget, bids, and more.
Rules Action List

There are the following actions available for automated rules in Google Ads:
- Enable campaign/ad group/ads/keyword
- Pause campaign/ad group/ads/keyword
- Change campaign budget
- Change ad group/keyword bids
- Change keyword bidding
- Change labels
- Send Email
How To Set Automated Rules
- Go to the Campaigns, Ad Groups, or Keywords pages.
- Click the 3-dot icon above the statistics table.
- Select Create an automated rule.
- Select Change budgets from the “Type of rule” drop-down.
- Choose which campaigns to change budgets for (All enabled campaigns, All enabled and paused campaigns, or Select campaigns).
- Under the “Action” drop-down select Increase budget. You can choose to increase your budget by a percentage or specific amount. If you’d like to ensure your budget cost doesn’t exceed a certain amount for the billing period, you can set an optional upper budget limit.
- To add a condition, click + ADD, under “Condition”.
- Define the frequency of your rule.
- Choose the type of email updates you’d like to receive on issues affecting your rule.
- Name your rule.
- Click Preview to ensure you’ve set up your rule to run the way you want. Previewing is just for verification and doesn’t make any permanent changes to your account.
- When you’re done, click Save rule.
Check the Google Ads Automated Rules Complete Guide for more details.

11. Google Ads Optimization Tips
11.1. Add Negative Keywords To Your Campaign
After you’ve created your Google Search campaign, it is a good practice to add negative keywords. It’s important to identify and exclude from your campaign keywords-searchers – that wouldn’t deliver a return on your investment.
The main reason to exclude negative keywords from your campaign is to prevent your ads from showing up alongside search queries that are irrelevant or offensive.
For example, an advertiser of a high-ticket offer that would like to target affluent customers would want to exclude such terms as “cheap”, “free”, “no deposit” from the Search Network campaign by adding them to the negative list. This action will prevent your ads from appearing alongside those terms.
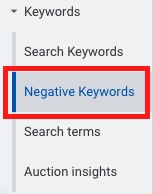
11.1.1. Navigate to Keywords section ➜ + Negative keywords ➜ Add negative keywords or create a new list
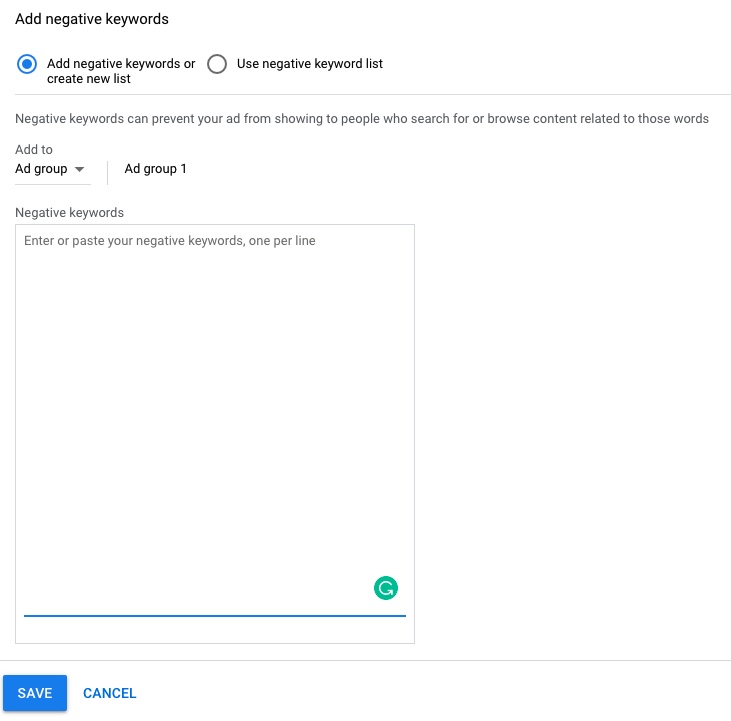
By avoiding paying for useless clicks, you save a lot of money by weeding out searchers who aren’t a fit for your business. You can also avoid bidding against yourself, cannibalizing impressions, and watering down your keyword-level data.
11.2. Exclude bad performing placements
The main optimization process around Google Ads goes around checking, analyzing, and excluding bad performing placements and bidding higher on good performing placements.
Navigate to campaign’s Placements ➜ click Where ads showed

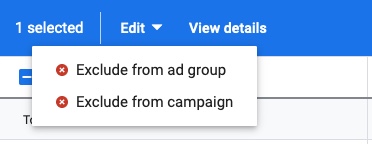
Select bad performing placements ➜ click Edit ➜ Exclude from ad group or Exclude from the campaign
Criteria to exclude placements from your campaign:
- Placements don’t convert at all, or cost per conversion (CPC or CPCon) is too high and exceeds your target cost per acquisition (CPA);
- The placement’s click-through rate (CTR) is too low, and it spends most of your budget without incoming conversions from it.
Learn more about optimizing your Google Display Ads and Google Search Network campaign optimization.
P.S. I hope this article was helpful to you. If you have any questions, suggestions, or you’d like to share something related to the topic, please drop a line in the comment section below.
Cheers ?


