Google Ads Conversion Tracking Guide 2021. Conversion Set Up & Tracking Complete Tutorial
Conversion tracking is critical to successful online marketing. It lets you see what people do – the conversion actions they take – after seeing your ad. You set up one conversion action at a time, but you can track multiple conversion actions at once.
When you run ads with Google Ads, you may want to see whether clicks on your ad led a customer to take a certain action, such as a purchase on your website, calling your business, or downloading an app.
In this article, you’ll find a complete guide and best practices on how to set up and track your conversions in the Google Ads. You’ll learn everything there is to know about Google Ads conversion tracking, to become a PPC Hero.
Google Ads Conversion Tracking Quick Navigation:
![]()
1. Google Ads Conversion Tracking: The Basic Setup
Conversion tracking involves generating an HTML code in the Conversion section of the Google Ads account that you insert into your landing page on your website immediately after your lead reaches the conversion event (i.e. “Thank you page”, “Order Confirmation” or “Thanks for Your Email”).
Alright, let’s get started
![]()
1.0. Navigate to Tools and Settings tab ➜ select Conversions ➜+ create Conversion

1.1. Select the kind of conversion to track ➜ select the source of conversion you’d like to track
![]()
Here’s a more detailed walkthrough of the Website conversions source:
Within Websites conversions you can choose from the following categories:
- Sales categories:
- Purchase
- Add to cart
- Begin checkout
- Subscribe
- Leads categories:
- Contact
- Submit lead form
- Book appointment
- Sign-up
- Request quote
- Get directions
- Outbound click
- More categories:
- Page view
- Other
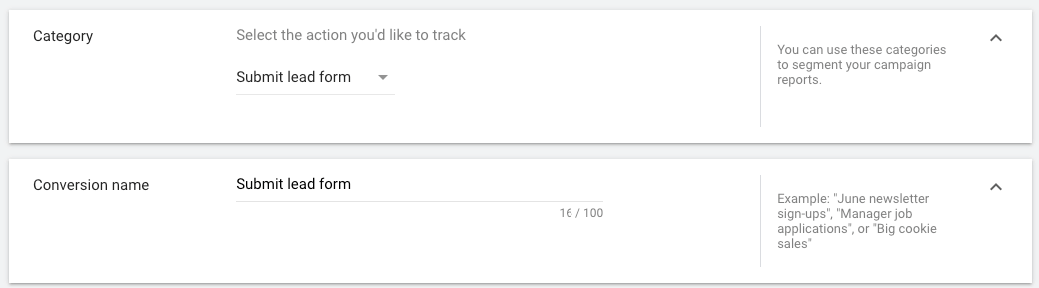
1.2. Select the appropriate Category Enter the name of your conversion
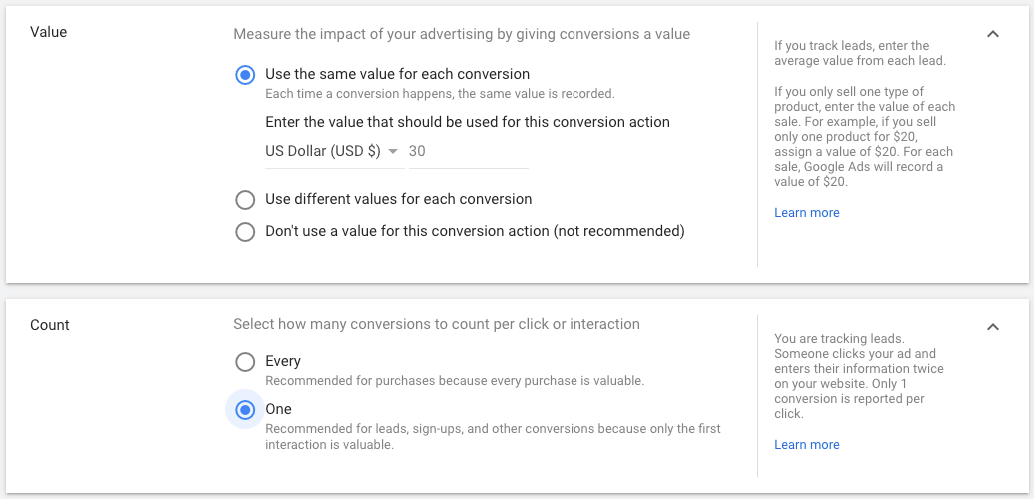
1.3. Select Use the same value for each conversion ➜ Choose a currency and enter the value (amount) of your conversion
1.4. Select the Click-through conversion window

Conversions can happen days after a person interacts with your ad. Select the maximum time after an ad interaction that you want to count conversions
The conversion window is how long a conversion can be recorded after an ad interaction.
1.5. Select the View-through conversion window

Your view-through conversion window is how long a view-through conversion can be recorded after an impression.
View-through conversions are conversions that happen after an impression of, not an interaction with, your ad.
1.6. Include in “Conversions”

This setting lets you decide if these conversions should be included in your “Conversions” and “Conversion value” columns. If you uncheck it, data will still appear in the “All Conv.” column.
1.7. Select the Attribution model ➜ and then press Create and Continue

As a definition according to Google, attribution modeling is: “the rule, or set of rules, that determines how credit for sales and conversions is assigned to touch points in conversion paths.”
Last-Click Model (Default Model)
When setting up a campaign on Google Ads, if you have never tweaked your attribution settings, you will always be running the last-click attribution model.
This is the default setting for Google Ads and Google Analytics.
Last-click is exactly what you’d think it is: giving credit for conversions/sales/ whatever your goal is to the last-clicked keyword or ad, etc.
1.8. Click Create And Continue
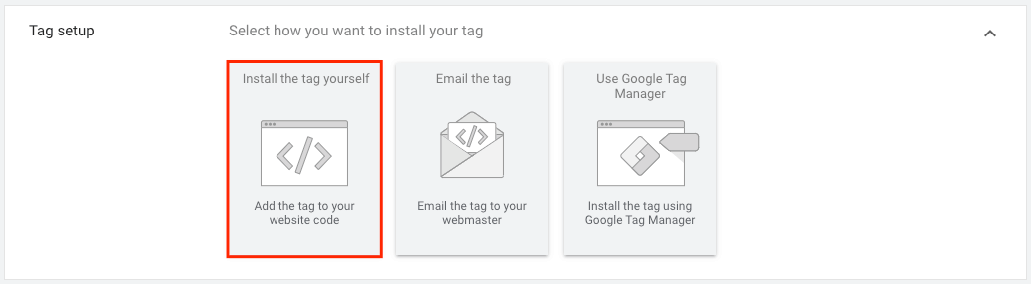
1.9. Tag setup ➜ Install the tag yourself
You’ve created a conversion action. Now, set up the tag to add to your website.
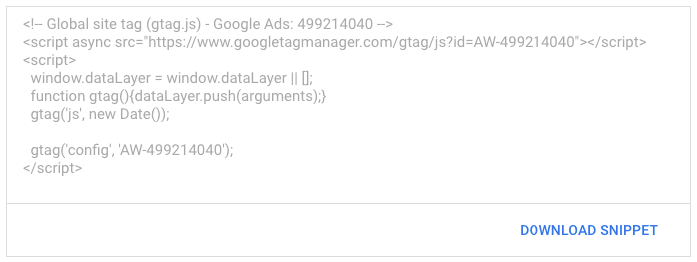
Global site tag
To set up your conversion tracking lead form, you should paste the global site tag and an event snippet in the code your page uses.
Copy the provided tag and paste it in between the <head></head> tags of every page of your website. Or if you’re using WordPress, just paste this code once in the header.php file. You only need to install the global site tag once per account, even if you are tracking multiple actions.
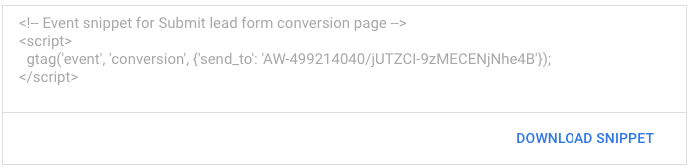
Event snippet
The event snippet works with the global site tag to track actions that should be counted as conversions. Choose whether to track conversions on a page load or click.
Select which event you want to track:
- Page load: Count conversions when someone loads a new page, such as an “Order Confirmation” page or “Thank you page”;
- Click: Count conversions when customers click a button or link (such as a “Buy Now” button).
Copy the provided snippet and paste it in between the <head></head> tags of the page(s) you’d like to track (i.e. “Thank you page, right after the global site tag.
Things to note:
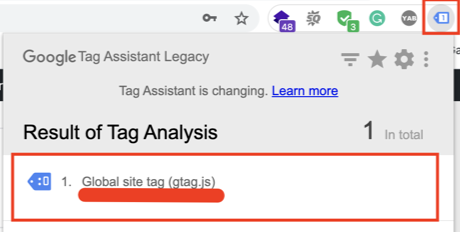
- It might take a few hours to verify that the tag is on your website. To make sure your tag is working, check the tracking status on the “Conversion actions” page.
- You can also use the Google Tag Assistant plugin for Chrome to make sure your tag is working.
- You can edit conversion actions at any time on the conversions page.
![]()
2. Import conversions from another Source
These options let you import conversions from another source into Google Ads.
You can import conversions from a linked accounts, or select “Other data sources or CRMs” to upload conversions in a file or with the API.
One of the conversion sources could be Google Analytics.
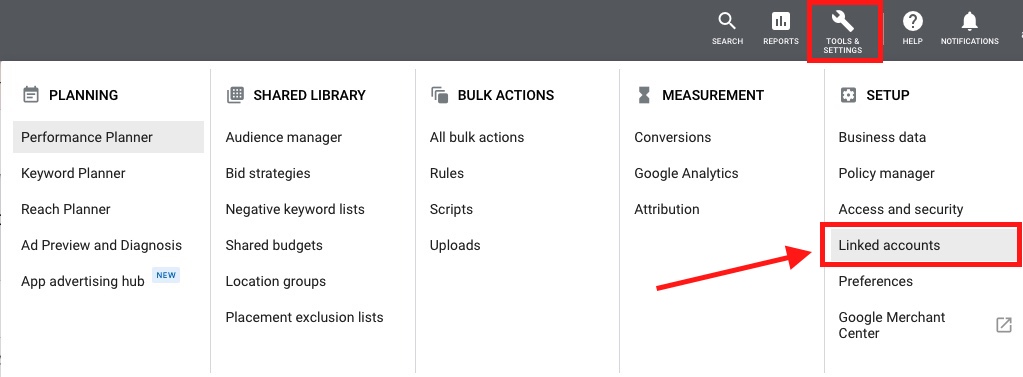
NOTE: In order to use Google Analytics as a source of conversions, first, you’ll need to link your Google Analytics with the Google Ads account
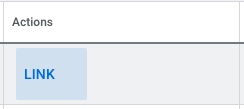
2.1. Navigate to the Tools and Settings tab ➜ select Linked account
2.2. Select the source ➜ Actions ➜ Link
2.3. Navigate to the Tools and Settings tab ➜ select Conversions
+ create Conversion
![]()
2.4. Click + create Conversion
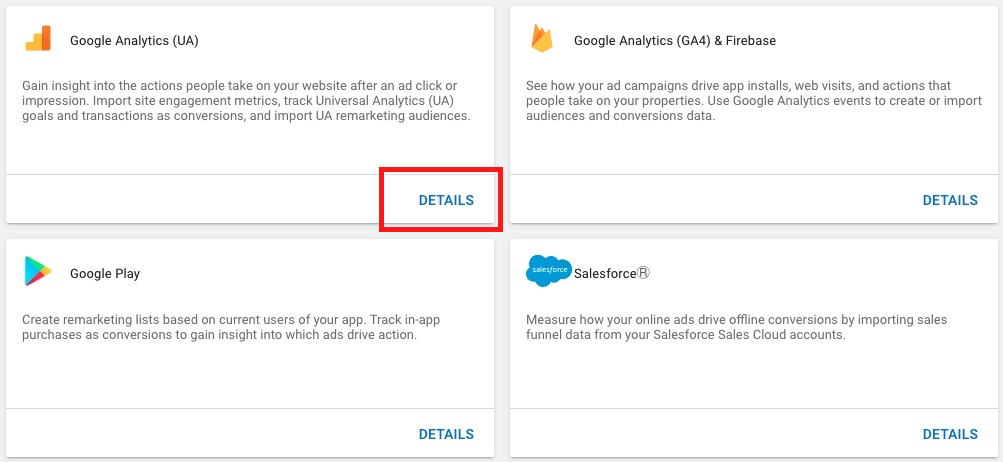
2.5. Select the kind of conversion to track ➜ select the source of conversion you’d like to track ➜ select Import

2.6. Select the source of conversion to track
![]()
These options let you import conversions from another source into Google Ads:
- Google Analytics (UA)
- Google Analytics 4
- Third-party app analytics
- Salesforce
- Other data sources or CRMs
Let’s say you’d like to import conversion events from your Google Analytics.
Learn more about how to set up conversions with Google Analytics 4 and Google Tag Manager.
Then select Google Analytics (UA) or Google Analytics 4, depending on which of them is currently running on your website.
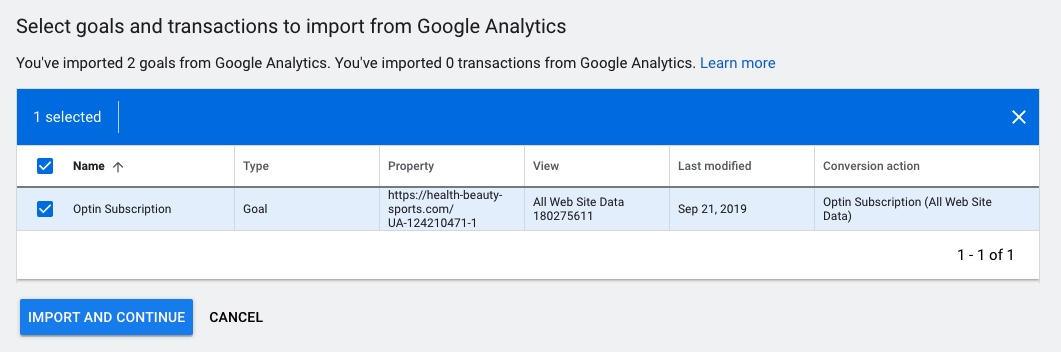
2.7. Select goals to import from Google Analytics