How To Create A Facebook Pixel
So what is a Facebook pixel?
The Facebook pixel is a piece of code you place on the backend of your website to track visitors to your site. The pixel allows you to run highly targeted campaigns, so it’s important to install it before running Facebook ads.
A Facebook pixel will help you track user behavior to:
- Bring back website visitors using retargeting on Facebook (a Custom Audience)
- Allow Facebook to find new people most likely to convert to your ad offers (a Lookalike Audience)
- Get reports in Ads Manager about conversions, audiences, and your website visitors.
You’ll want to put one on each of your main website and landing pages (Business Manager will let you create up to 100 pixels.)
Here’s how to create your pixel:
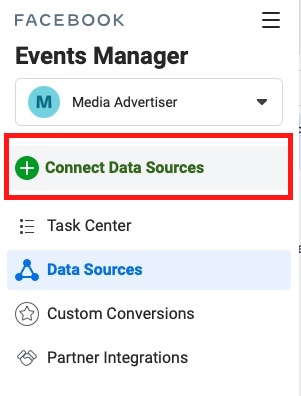
- Go to Ads Manager ➜ Events Manager
![]()
- Click the + button labeled “Connect a Data Source” and choose “Web”
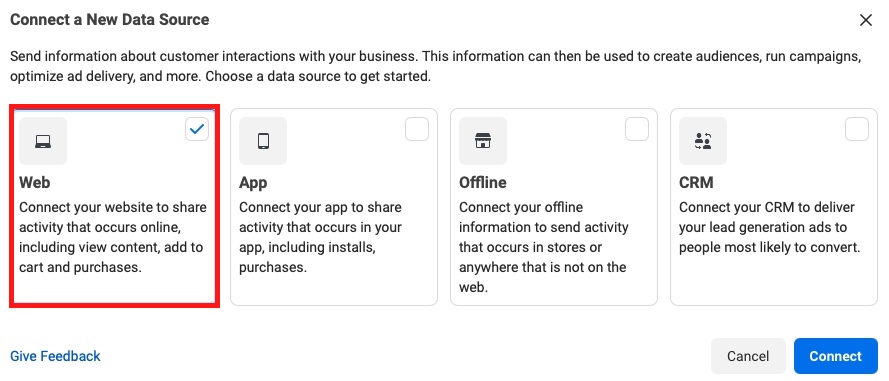
- Select “Facebook Pixel” and hit the Connect button ➜ then click Continue
![]()
- Enter a name for your pixel
- Enter your website’s URL on which you’d like your Facebook pixel to appear and track the activity
![]()
- Select Continue and “Set up the Pixel Now”
You have three options to set up the pixel:
- Manually add pixel code to the website
- Use a partner Integration
- Email Instructions
1. Connect Facebook pixel using a partner integration
Let’s say you want to install Facebook Pixel to your WordPress website. Then you’ll just need to select the WordPress platform and install Facebook for the WordPress plugin.
- Click on Plugins and select Add New from the dropdown menu.
- Search and choose Facebook for WordPress.
- Select Install Now and then select Activate.
![]()
- Select Settings and choose Facebook from the dropdown menu.
- Search Get Started and follow the instructions.
- Verify your pixel is working by sending test traffic to your website
![]()
Benefits of using a partner to manage your pixels include:
- Not having to mess with your website’s code (this is a big plus for me)
- Automatic tracking on user actions during a website visit (e.g., viewing your content, completing a page registration)
- Automatic reporting when you create ads (no need to set up ads manually)
2. Email your pixel to a developer
The second method of installing your pixel on your site is to send it to a developer.
Choose ‘Email Instructions to a Developer’ in the install pixel menu. Enter your developer’s email and copy the codes from any events (website actions) you want them to include using the ‘Get Event Code for Conversions’ button. Make sure the pixel you created is ‘Active’ before you hit ‘Send.’
3. Manually install your pixel
- Go to Ads Manager ➜ Events Manager ➜ Pixels and click on “Set Up.” ➜ Select Install Code Manually
![]()
- Copy base code and paste it to your website just above the closing </head> tag.
- Install the base code on every page of your website.
![]()
Facebook Pixel Helper Chrome Extension
![]()
The Pixel Helper is a Chrome Browser extension that runs in the background to automatically review websites for Facebook Pixel code.
When the extension is installed a </> icon, the Pixel Helper icon, will appear in the upper right corner of the browser next to the address bar.
![]()
When a website has a Facebook Pixel installed the Pixel Helper icon turns blue and a small badge will appear indicating the number of pixels found on the webpage.
Install Pixel Helper
To use the Facebook Pixel Helper you must:
- use the Chrome web browser
- install the Pixel Helper extension from the Chrome Store
Verify Pixel Implementation
Navigate to your website in the Chrome browser, and click on the Pixel Helper icon. The popup will tell what pixels were found on the webpage, and whether they have loaded successfully.
![]()


